Count Dooku #11
Guest Reviewer: Stephen
ATTACKTIX CLASS: Leader
STAR WARS CLASS: Sith
POINT VALUE: 20
SPEED: 12
SPECIAL POWER: Recover (Sith)
SPECIAL POWER RATIO: 8/26 (31%)
ATTACK TYPE: Striker (Lightsaber)
Count Dooku is an underrated striker. He holds his saber well at two different levels, and his strike is full of power. However, his silly little flippy cape can hamper less experienced strikers, and his light base can make him an easy target for attacks.
Dooku plays rather nicely with other Sith, though his special power isn't very likely to help out. He may make a nice second-line striker who's protected by beefier figures in front of him.
Tips for attacking with Count Dooku:
Count Dooku is a surprisingly powerful striker. He is often able to hold his lightsaber either at chest or hip level, which allows you to have two angles of attack on figures. However, when he attacks from the hip, his saber can often brush over his leg, which saps a lot of the power from his strike. Thus, it's often better to have him attack with his saber raised to the middle of his chest.
You'll also find his cape to be an annoyance. I always keep it flipped up, as he's rather difficult to use properly otherwise. However, the up-flipped cape presents only a small, slim target to your opponent, so don't worry about it.
Count Dooku's special power allows him to pop up if he's knocked down, but it's not likely to come up. Thus, don't use him as a front-line striker with whom you tempt fate. Rather, he's a good reservist whose special power can really demoralize an opponent if it becomes active.
Tips for attacking Count Dooku:
Even from 10 Tix away, Count Dooku can be knocked down with a well-placed small or large missile to his chest or back. However, at 15 Tix, a Force blast to the chest or back is usually necessary to bring him down, as missiles tend to bounce off him from that range. Strikers will have an easier time bringing Dooku down. A one-quarter power hit to Dooku's front, back, or sides should tap him down easily.
If you can take out the Sith that are on Count Dooku's team, he won't be able to pop back up again when you knock him down. However, his power isn't even that likely to come up. Hence, if you play the odds, you'll likely be able to knock him down without him coming back for more.
Alternative Strategies
Count Dooku should be kept behind figures with larger bases to permit them to absorb shots (perhaps including Emperor Palpatine, who needs a Sith to Recover). However, his saber can be used to support the backs of front-line figures, giving them additional stability. He could be a valuable part of a mixed shooter-striker team who moves in to make multiple kills when the shooters get into close range, point blank shooting furies.
However, he could also be a valuable part of a Sith striker team. Being with other Sith will keep him alive if his special power comes up, and his speed will let him press a fast attack with other strikers.
Thursday, June 23, 2005
Wednesday, June 22, 2005
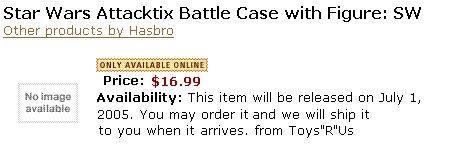
Attacktix Battle Case Available ONLINE ONLY - Retracted
Okay, I am updating this post with new news from Hasbro, themselves (Thanks, Sean):
I will leave my original post, so that people who read this earlier will not think they have gone crazy!

I just got off the phone with Hasbro Customer Service (1-800-327-8264) and asked about the Star Wars Attacktix Battle Case (item #68072). I typed out all the info so others can call and see if they get any different responses. Here's what I got...
The nice gentleman stated that they were shipping to stores (Target, Wal*Mart, etc.) and would be there soon. When asked why ToysRUs.com/Amazon.com was advertising the case as an online exclusive he said that they more than likely received some 'early' (more than likely the same shipment that BigBadToyStore.com and EntertainmentEarth.com received [and I ordered from] a month or so ago) and that the case is not an online exclusive. When asked again "So, the case will be available in stores?" he said "Yes, it's shipping now and will take a little while to get there."
I will leave my original post, so that people who read this earlier will not think they have gone crazy!
Current news on Amazon.com is that the Attacktix Battle Case is not going to be on shelves, period!
Now, with a shipping date of July 1st, the Battle Case looks to be available only through online retailers.
You can always pre-order it here and be sure to get one. If it ever goes up on Walmart.com I'll post that here as well!
Star Wars Attacktix Battle Case with Figure - $16.99
Friday, June 17, 2005
Attacktix Base Repair 201 : Attacktix Autopsy II
Welcome back students. Today's class will build upon Dr. Manzo's Attacktix Autopsy Course, which can be viewed here...
Today I will tackle 2 'tix base problems. I had to perform operations on a few of my Attacktix and these are some of my findings.
Problem #1: My Base Will Not 'Tick'
I had a clone trooper that I opened just as a test out opening up the base before I operated on my Darth Vader (more on that later). The trooper was just a test subject. He didn't tick and I had no initial intention of fixing him. It happened on accident. Here's what I did...
To open up the base insert a sharp x-acto blade into the space between the two parts that make up the base on the bottom. Run the knife completely around the circle of the base. You will more than likely encounter 2 points of resistance. These points are where the glue is and it must be cut.
After you have run the x-acto knife around the base you will need to separate and remove the center part of the base. I recommend the smallest flat-headed screwdriver you can find. I used the screwdrivers that are used for fixing eye glasses or small electronics. You will have to work the inner section out, but be careful. I found that with too much pressure small white lines will begin to appear in the outer part of the base. These white lines are a prelude to a crack, and nobody want's that.
I found it's best to attack the inner base this way. On the bottom and on top (if you are looking at the printing on the bottom the right 'reading' way) you will notice a small tab that is attached to the outer ring of the base. Now, where this tab meets the inner part of the base is where you want to attack. The walls of the inner part of the base are tall and run the entire length of the base (and if you try to pry there you will get the white lines/cracking) except where there is a space for the tab. Here is a clear opening to the inside. With whatever tool you are using (remember the smaller the better) work the base at this area until you can move it enough to get your tool actually inside the base. With your tool inside slowly and carefully pry the inner base off.
See Dr. Manzo's post for more on this.
OK, let's get back to fixing the problem. Pay attention to the inner make-up of your base because you'll have to put it back together. Like I said, I had no intention of fixing my non-ticking Clone. He was just a test to see if I could open a base without messing it up. After I got him open I wanted to practice putting all of the parts back together. I put the Clone back together and gave him a test... and he WORKED!! I don't know what I did, or what was originally wrong. But I opened him up, took apart his base, put him back together and he worked again.
So to solve Problem #1: just open your non-ticking figure and play around. It may just be a simple miss-alignment that is keeping you from 'tix fun.
Problem #2: My Figure Keeps Dropping His C-Ring
I had 2 Armor Darth Vaders with this problem. I wrote off the first and gave it to a friend as a computer display piece. When my second Vader lost his ring I decided to take matters into my own hands. As Dr. Manzo stated in his autopsy lesson your 'tix will still work without his ring, but the ticking and color wheel (red/black top - white bottom) will be loose. I prefer my 'tix in perfect working order.
So, to fix this problem... take the base apart just like above. In the top part of the base (the part that is still attached to the figure) and you will see a small raised circle. Around this circle resides your rubber c-ring, and around that rides your color wheel. My solution was to crazy glue the c-ring to the small raised circle. Keep in mind that you want to keep this ring 'rubbery' so only glue the inner side of the ring to the circle.
Now you need to make some small adjustments to your color wheel. Since the c-ring is meant to move along with your color wheel and now it is stationary your 'tix base will freeze up if you don't adjust the color wheel. Take your x-acto knife and carefully scrape a small amount of plastic from the inner hole in your color wheel. Just a little bit. Keep checking how much plastic to remove by placing the wheel back around the glued c-ring and see if you can move it easily with your fingers. If it still seems too tight remove some more, but not too much 'cause that will make it loose and a loose wheel is the reason for this whole operation. If your wheel seems right to you, you are done. You may want to sand down the inside of the circle you were just removing plastic from. If you don't have sand paper handy I find that the non-blade end of a pencil-shaped x-acto knife works well for these small jobs. The end of which I speak is the silver tightening part that has a somewhat diamond pattern cut into it. Just run this back & forth and all around the inner circle.
Now, pop your base back together and test it out. Remember you don't have to glue it back together yet. Give it a good test and when you are satisfied reseal the base with some crazy glue & there you have it.
That's all for today class. If anyone has done other repairs on their Attacktix please share with the class.
Wednesday, June 15, 2005
Attacktix Official Tournament Information
Thanks Sean for this info from Rebelscum.com:
Full Article
(Q): Do you know if there is going to be any Attacktix tournaments anytime soon or Star Wars conventions or parties or anything anytime soon?
(A): Hasbro will have something at Comic Con, but there's been no word on individual tournaments outside the conventions. I'd give the line a chance to catch on, hopefully at one point leagues will start to form and at that time we'll see more tournament play. I'm sure Hasbro will do whatever they can to get the ball rolling though, hang in there
(Q): Lastly Attacktix. I love them!!! I have a great time battling my 8-year-old son with SW figures. I wanted to know when series II is coming out and are there any plans to continue the line. I hear a lot of collectors aren't into Attacktix and this can dampen any hope to see future figures like a Qui-Gon, an episode IV Obi, or my dream…a redeemed Anakin that can over power the Emperor!
(A): I hear ya, my kids and I have had great fun with the Attacktix line. As far as I know, no plans for a third series have been made public, but I'm sure they're in place. Series 2 will be on display at Comic Con next month, and probably in stores soon after that. Not sure where you're at, but all the Attacktix pegs in my area are short on stock, from what I see the line has sold, and is selling pretty well. If the numbers are good, I'm sure we'll see plenty more from this line, including many of the figures you mentioned.
Sunday, June 12, 2005
SFX's Toy Shop - Jabba the Hutt Concept Mega Figure
Hey gang, welcome to the Toy Shop!
As you can tell by the great threads about game play variations and future figures, Attacktix lends itself to creativity. I've had a few ideas rattling around for awhile and I thought I'd share them with you. Think of them as figure mods, but instead of paint & clay I'll use ones & zeros.
Today I'm going to tackle Jabba the Hutt. Since the early days of Attacktix, oh so long ago, one of the characters people wanted to see immortalized in 'tix form was the Hutt. I, on the other hand, was of a different opinion. Jabba is one of my favorite characters but lets be honest, he's a fat slug that basically did jack-squat. He wasn't what I'd call a fighter so I didn't think he'd translate well into the Attacktix world.
But even more pressing in my mind was "How do you make him fall?" He's a short, squat, chubby dude. Not exactly the type that is easy to knock over. But it was this problem that got my mind a-racin'. Design comes in many forms. Sometimes you develop a cool idea and sometimes you have to come up with a creative solution to a problem. And the problem of knocking the Hutt on his ass was a problem I wanted to solve. I give you...
JABBA THE HUTT
(original photos via Rebelscum.com)
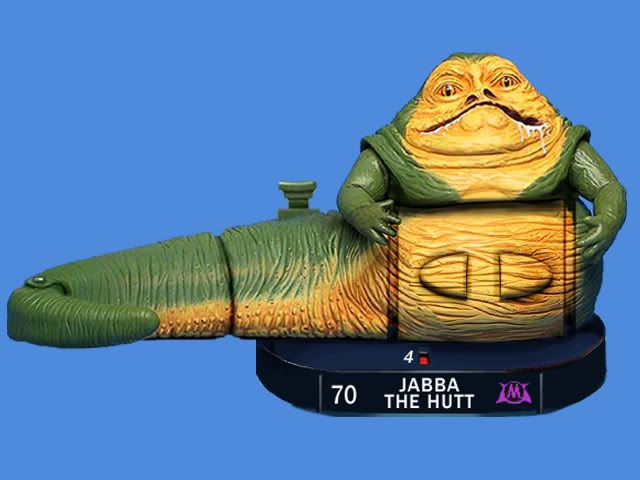
Jabba is a MEGA and can be broken down to 3 major sections
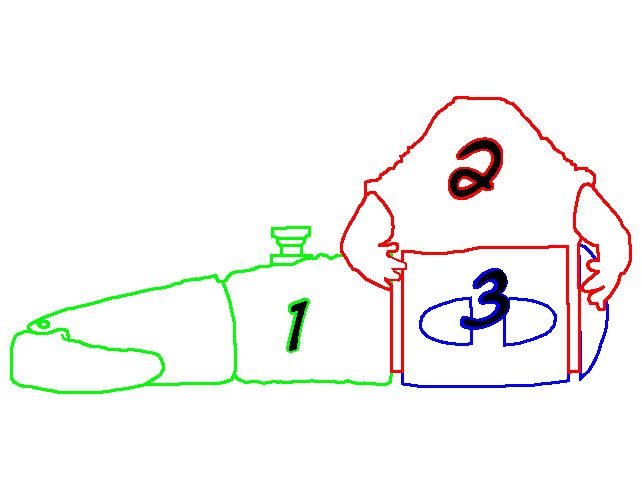
1. TAIL/STRIKER (works just like Boga)
2. HEAD
3. TARGETS/TORSO
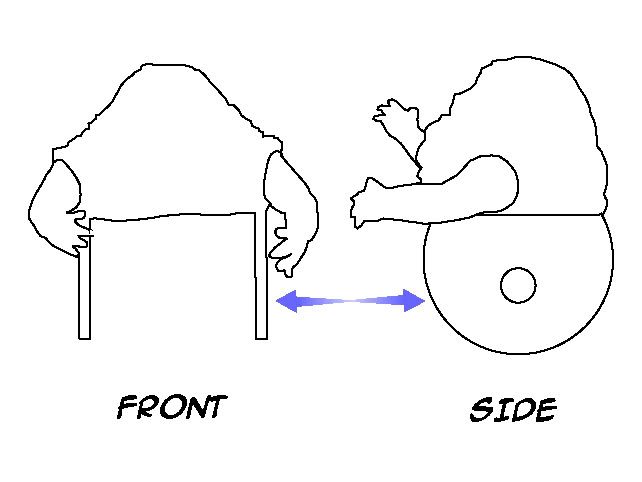
His HEAD is solid plastic and very heavy. It features two large TABS with holes in them (as seen in the side view).

His barrell shaped TORSO contains the TARGETS (a) and a ROD (b) that runs the length of the TORSO. This ROD goes through the HOLES (c) in the TABS and creates a kind of hinge.
How does he work?

A. When both of the TARGETS are hit
B. the HEAD is released and falls backwards...
C. rotating around the ROD
D. The weight of the head falling backwards causes the base to tip and lift off of the playing surface
Jabba's special power is:
ATTACKBACK: Free move and attack for up to two of your BOUNTY HUNTERS
What does this mean?
Well it's pretty self explanatory... you can knock Jabba out.. Momma said knock him out!!
And there you have Jabba the Hutt: MEGA. But, he's pretty similar to the Boga and in a game that looks like it will get more innovative with each release, kinda simple. He's just missing that special something. What could it be?...
Ahh yes, he needs a little Crumb. That's right folks, the nastiest muppet around, SALACIOUS CRUMB, is just the guy to spice up our game play.
How does he work?
SALACIOUS will sit on a small track in front of JABBA. He will be connected to JABBA's tix wheel. As JABBA moves SALACIOUS will slide back and forth blocking a TARGET. He will have to have some kind of special gearing that allows him to move back and forth in a somewhat random fashion. If he moved back and forth evenly people could cheat by timing his movements to block a certain TARGET.
I think that Mr. Crumb will add just a bit more of that 'fun factor' that makes Attacktix the game we all love.
Here is the completed Jabba

Well, that's it for today's Toy Shop! Join us next time for...
FORCE JUMP FIGURES
As you can tell by the great threads about game play variations and future figures, Attacktix lends itself to creativity. I've had a few ideas rattling around for awhile and I thought I'd share them with you. Think of them as figure mods, but instead of paint & clay I'll use ones & zeros.
Today I'm going to tackle Jabba the Hutt. Since the early days of Attacktix, oh so long ago, one of the characters people wanted to see immortalized in 'tix form was the Hutt. I, on the other hand, was of a different opinion. Jabba is one of my favorite characters but lets be honest, he's a fat slug that basically did jack-squat. He wasn't what I'd call a fighter so I didn't think he'd translate well into the Attacktix world.
But even more pressing in my mind was "How do you make him fall?" He's a short, squat, chubby dude. Not exactly the type that is easy to knock over. But it was this problem that got my mind a-racin'. Design comes in many forms. Sometimes you develop a cool idea and sometimes you have to come up with a creative solution to a problem. And the problem of knocking the Hutt on his ass was a problem I wanted to solve. I give you...
JABBA THE HUTT
(original photos via Rebelscum.com)
Jabba is a MEGA and can be broken down to 3 major sections
1. TAIL/STRIKER (works just like Boga)
2. HEAD
3. TARGETS/TORSO
His HEAD is solid plastic and very heavy. It features two large TABS with holes in them (as seen in the side view).
His barrell shaped TORSO contains the TARGETS (a) and a ROD (b) that runs the length of the TORSO. This ROD goes through the HOLES (c) in the TABS and creates a kind of hinge.
How does he work?
A. When both of the TARGETS are hit
B. the HEAD is released and falls backwards...
C. rotating around the ROD
D. The weight of the head falling backwards causes the base to tip and lift off of the playing surface
Jabba's special power is:
ATTACKBACK: Free move and attack for up to two of your BOUNTY HUNTERS
What does this mean?
Well it's pretty self explanatory... you can knock Jabba out.. Momma said knock him out!!
And there you have Jabba the Hutt: MEGA. But, he's pretty similar to the Boga and in a game that looks like it will get more innovative with each release, kinda simple. He's just missing that special something. What could it be?...
Ahh yes, he needs a little Crumb. That's right folks, the nastiest muppet around, SALACIOUS CRUMB, is just the guy to spice up our game play.
How does he work?
SALACIOUS will sit on a small track in front of JABBA. He will be connected to JABBA's tix wheel. As JABBA moves SALACIOUS will slide back and forth blocking a TARGET. He will have to have some kind of special gearing that allows him to move back and forth in a somewhat random fashion. If he moved back and forth evenly people could cheat by timing his movements to block a certain TARGET.
I think that Mr. Crumb will add just a bit more of that 'fun factor' that makes Attacktix the game we all love.
Here is the completed Jabba
Well, that's it for today's Toy Shop! Join us next time for...
FORCE JUMP FIGURES
Mace Windu #19 Tips and Tricks
Mace Windu #19
Guest Reviewer: Stephen

ATTACKTIX CLASS: Warrior
STAR WARS CLASS: Jedi
POINT VALUE: 30
SPEED: 10
SPECIAL POWER: Recover (Jedi)
SPECIAL POWER RATIO: 10/26 (38%)
ATTACK TYPE: Striker (Lightsaber)
Mace Windu is to the Jedi what Darth Vader is to the Sith: nearly an Attacktix god. Besides having an insanely powerful lightsaber, he's surprisingly resistant to attacks. Plus, he can raise himself from the dead if he's in the company of other Jedi.
Like Starter Kenobi, his slim profile can be an asset in advancing on your opponent. However, his tremendously large base helps keep him safe from oncoming shots.
Tip for attacking with Mace Windu:
Mace Windu has no robes to get in the way of fingers around the base, and his non-striking hand is raised out of the way close to his body, so his striking action is easy to perform. And oh my, will you ever want his striking action! When you become a proficient striker, you should be able to take out at least three figures at once if they're bunched up along the length of the lightsaber, irrespective of their base size. Yes, he's that good. Furthermore, his striking hand seems to be robust to breakage.
He's so good, he can take out an AT-RT all by himself! Here's how. Line him up in front of the AT-RT like so:

His saber hand should be in front of the hole in the target on the AT-RT's right leg, and his saber's tip should overlap the end of the target on the left leg of the AT-RT. Furthermore, his saber should be parallel with the top edges of the targets and about 1 cm away from them. Next, turn Mace's base as far around as you can, holding the tip of his saber and keeping the saber parallel to the targets. Now, let it fly. For me, more than 9 times out of 10, the AT-RT will either fall down or fly off the playing field. I like to call this Mace-ing! (tm)
Though Mace Windu's special power is less likely to be activated than Darth Vader's, he'll still recover if his fellow Jedi on your side haven't been slaughtered. With Mace Windu on the front line of a Jedi striker team, it's hard to go wrong. Because the strikers are so fast, they can close the distance on shooter teams before they have much of a chance to take you out. And even if they do land shots on you, Mace's tremendous base will likely help to deflect those shots off his powerful chest.
Tips for attacking Mace Windu:
The short story here is that you don't want to plan on attacking Mace Windu just once unless you've got a Force blaster. Even from 5 Tix away, a small missile right to his exposed front side has perhaps a 25% chance of knocking him down. From 10 Tix away, a large missile to his front can bring him down, but if it's aimed at his back or side, he likely won't fall. However, even at 12 Tix, a Force blast can knock him down from the front, rear, or side.
Mace Windu can be knocked down by strikers, especially when the blows are directed toward his front side. He'll fall with a one-third power strike there. If you hit his back or non-saber arm, you'll need a half-power strike to bring him down. If your only choice is to hit his saber-wielding hand, though, you'll need a full-power hit to have even the slightest chance of knocking him over.
Though his power allows him to stand right back up if he's got fellow Jedi still standing, it doesn't have the highest probability of being activated. So while it may be a good idea to pick off a bunch of the Jedi surrounding Mace, you might not need to do so. If you're brave and can isolate Mace from his compatriots, he becomes easier to topple, especially if you can get a couple of shots or strikes at him.
Alternative Strategies
Mace Windu is an excellent front-line leader of a team of figures. His solid base and construction let him absorb shots with ease that would fell a lesser teammate. As long as he's got some support from the bases of figures behind him, he should be a nearly unstoppable part of a striking team, particularly if he's turned so that he's facing your opponent's figures with his narrow profile.
Of course, you could also use him as a blocker in front of a team of weaker shooters. Mace will be able to block with his body shots from other shooters, but he leaves enough space around his saber to let any shooter attack over him, and he has enough space over his left shoulder to permit a taller shooter to launch over it.
Guest Reviewer: Stephen
ATTACKTIX CLASS: Warrior
STAR WARS CLASS: Jedi
POINT VALUE: 30
SPEED: 10
SPECIAL POWER: Recover (Jedi)
SPECIAL POWER RATIO: 10/26 (38%)
ATTACK TYPE: Striker (Lightsaber)
Mace Windu is to the Jedi what Darth Vader is to the Sith: nearly an Attacktix god. Besides having an insanely powerful lightsaber, he's surprisingly resistant to attacks. Plus, he can raise himself from the dead if he's in the company of other Jedi.
Like Starter Kenobi, his slim profile can be an asset in advancing on your opponent. However, his tremendously large base helps keep him safe from oncoming shots.
Tip for attacking with Mace Windu:
Mace Windu has no robes to get in the way of fingers around the base, and his non-striking hand is raised out of the way close to his body, so his striking action is easy to perform. And oh my, will you ever want his striking action! When you become a proficient striker, you should be able to take out at least three figures at once if they're bunched up along the length of the lightsaber, irrespective of their base size. Yes, he's that good. Furthermore, his striking hand seems to be robust to breakage.
He's so good, he can take out an AT-RT all by himself! Here's how. Line him up in front of the AT-RT like so:
His saber hand should be in front of the hole in the target on the AT-RT's right leg, and his saber's tip should overlap the end of the target on the left leg of the AT-RT. Furthermore, his saber should be parallel with the top edges of the targets and about 1 cm away from them. Next, turn Mace's base as far around as you can, holding the tip of his saber and keeping the saber parallel to the targets. Now, let it fly. For me, more than 9 times out of 10, the AT-RT will either fall down or fly off the playing field. I like to call this Mace-ing! (tm)
Though Mace Windu's special power is less likely to be activated than Darth Vader's, he'll still recover if his fellow Jedi on your side haven't been slaughtered. With Mace Windu on the front line of a Jedi striker team, it's hard to go wrong. Because the strikers are so fast, they can close the distance on shooter teams before they have much of a chance to take you out. And even if they do land shots on you, Mace's tremendous base will likely help to deflect those shots off his powerful chest.
Tips for attacking Mace Windu:
The short story here is that you don't want to plan on attacking Mace Windu just once unless you've got a Force blaster. Even from 5 Tix away, a small missile right to his exposed front side has perhaps a 25% chance of knocking him down. From 10 Tix away, a large missile to his front can bring him down, but if it's aimed at his back or side, he likely won't fall. However, even at 12 Tix, a Force blast can knock him down from the front, rear, or side.
Mace Windu can be knocked down by strikers, especially when the blows are directed toward his front side. He'll fall with a one-third power strike there. If you hit his back or non-saber arm, you'll need a half-power strike to bring him down. If your only choice is to hit his saber-wielding hand, though, you'll need a full-power hit to have even the slightest chance of knocking him over.
Though his power allows him to stand right back up if he's got fellow Jedi still standing, it doesn't have the highest probability of being activated. So while it may be a good idea to pick off a bunch of the Jedi surrounding Mace, you might not need to do so. If you're brave and can isolate Mace from his compatriots, he becomes easier to topple, especially if you can get a couple of shots or strikes at him.
Alternative Strategies
Mace Windu is an excellent front-line leader of a team of figures. His solid base and construction let him absorb shots with ease that would fell a lesser teammate. As long as he's got some support from the bases of figures behind him, he should be a nearly unstoppable part of a striking team, particularly if he's turned so that he's facing your opponent's figures with his narrow profile.
Of course, you could also use him as a blocker in front of a team of weaker shooters. Mace will be able to block with his body shots from other shooters, but he leaves enough space around his saber to let any shooter attack over him, and he has enough space over his left shoulder to permit a taller shooter to launch over it.
Friday, June 10, 2005
Attacktix 101 - Striker Figures
Guest Reviewer: Stephen
Here's a tutorial for those interesting in improving their striking game. Because ImageShack's gallery view doesn't display things as I'd like, I've posted the text of it here. Beware, this is very picture heavy (16 x 250 kB images). You can see the Photoblog version of this tutorial here.
BEGINNING STRIKING
Setup

To start a successful strike, scoot your striker up to the target figure, making sure the striking surface (blade or paw) is parallel to the figure you want to strike down.
Twist

Now, this is the key. Twist the *base* of the figure, not the striking surface! Angle the striking surface at about a 20 degree angle from the figure to make it fly approximately straight away. Hold the tip of the striking surface between the tips of your thumb and index finger as you rotate the base of the figure between the thumb and index finger of your other hand.
Result

If you follow these directions, this should be the result. The bar in the middle of the screen is a 15 inch ruler. Hence, I was able to knock a 40-point Force blast figure about 24 inches (2 feet!) across the table. The smaller the base of the figure you're trying to strike, the farther it'll go, which offers up some interesting possibilities...
DISTANCE STRIKING
Setup

Consider the case when your opponent has spaced his or her figures across the playing surface (these clones are about 5 Tix apart). You can use one of your opponent's figures to take out the other! Again, sidle your striker up nice and close to the figure you want to strike (the farther away the second figure, the lighter the base of the first figure should be). In this case, Starter Kenobi is attempting to knock a Clone Trooper (10 points) into Commander Bly (30 points).
Twist

Hold the striking surface of your striker and hold the tip of it between the thumb and index finger of one hand. Turn the base of the striker with the thumb and index finger of the other hand. Position the striking surface about 20 degrees from being perfectly parallel with the figure you're going to strike.
Result

If you've gotten the angle of the striking surface correct in the previous step, the first figure should smack right into the second figure, knocking them both down and giving you a beautiful two-for-one combo! In this case, both figures would have flown off the edge of the playing surface, but for the rails on my table. But what if your opponent has bunched figures up together?
POWER STRIKING
Setup

This time, you'll want to get your striker up nice and close to the heaviest figure in the group. This may take a few Tix to accomplish properly, but it should be worth the effort. Note that Shooter Obi-Wan (40 points) is heading a group including a Super Battle Droid and a Clone Lieutenant (20 points each).
Twist

For pure power striking, make sure the striking surface covers as much of the lead figure's body as possible. Also, keep the striking surface perfectly parallel to the lead figure's body to ensure that the force of the strike is distributed as evenly as possible to the other two figures, as well.
Result

If you've kept the striking surface as close to the lead figure as possible, you should be able to knock down all three figures, if your striker is powerful enough. The Clone Lieutenant fell off the table shortly after this picture was taken, and the other two bounced off the rails. A sweet three for one!
And now, you know how to strike like a pro, using only a striker available in the starter set! You know how to put real power in your swing, which will allow you to score multiple kills with one hit, whether your opponent spreads his or her figures out or keeps them together.
STRIKER DEFENSE
Interweaved striking surfaces

The key to defending against a gang of shooters is to bunch your figures up in such a way as to maximize the defensive power of the whole group. In this case, stacking your strikers in a 2-figure-wide column - with the figures with the largest bases in front - is ideal for this purpose. However, because you're dealing with strikers, you can also use each figure's outstretched striking surface to provide further support for each figure. Here, you can see how each Jedi has another Jedi's lightsaber in front of him to maximize stability of the entire group. You should be able to do the same with hand strikers, interleaving the hands to "catch" figures that would otherwise fall. Let's see how this works against heavy fire.
Force blasts
Here, the group of four Jedi faces a pair of Force blasts at 5 Tix away.

One Force blast, directed at Striker Kenobi, does very little to perturb the integrity of the group.

And a second blast directed at Striker Kenobi still doesn't knock down any of the figures. Now the strikers can regroup and knock down the Force blasters mercilessly, probably with just one strike!
Large missiles
The striker group packs itself up again, this time to deal with a pair of large missile shooters.

A single missile shot at Agen Kolar's head doesn't knock anyone down.

Nor does the second missile, which has just managed to spin our intrepid Jedi around a bit. Again, the Jedi can regroup and spank the shooters right off the playing field.
Run from strikers!
However, if your strikers are going to combat other strikers, it's best to keep them spread out as widely as possible. Recall what happens when you pack a bunch of shooters together; the same will happen to even the best packed of strikers.

Observe the mischievous, impish "Baseball Bat Yoda" approaching an unsuspecting group of strikers.

And the damage he has wrought upon them, even though they were standing in their most tightly packed and interleaved group. Hence, when confronted with another pack of strikers, break up and knock them all to the ground with one or two well-placed strikers of your own, then group back up if only shooters remain in range to provide maximum stability to your striker group.
Here's a tutorial for those interesting in improving their striking game. Because ImageShack's gallery view doesn't display things as I'd like, I've posted the text of it here. Beware, this is very picture heavy (16 x 250 kB images). You can see the Photoblog version of this tutorial here.
BEGINNING STRIKING
Setup

To start a successful strike, scoot your striker up to the target figure, making sure the striking surface (blade or paw) is parallel to the figure you want to strike down.
Twist

Now, this is the key. Twist the *base* of the figure, not the striking surface! Angle the striking surface at about a 20 degree angle from the figure to make it fly approximately straight away. Hold the tip of the striking surface between the tips of your thumb and index finger as you rotate the base of the figure between the thumb and index finger of your other hand.
Result
If you follow these directions, this should be the result. The bar in the middle of the screen is a 15 inch ruler. Hence, I was able to knock a 40-point Force blast figure about 24 inches (2 feet!) across the table. The smaller the base of the figure you're trying to strike, the farther it'll go, which offers up some interesting possibilities...
DISTANCE STRIKING
Setup

Consider the case when your opponent has spaced his or her figures across the playing surface (these clones are about 5 Tix apart). You can use one of your opponent's figures to take out the other! Again, sidle your striker up nice and close to the figure you want to strike (the farther away the second figure, the lighter the base of the first figure should be). In this case, Starter Kenobi is attempting to knock a Clone Trooper (10 points) into Commander Bly (30 points).
Twist

Hold the striking surface of your striker and hold the tip of it between the thumb and index finger of one hand. Turn the base of the striker with the thumb and index finger of the other hand. Position the striking surface about 20 degrees from being perfectly parallel with the figure you're going to strike.
Result

If you've gotten the angle of the striking surface correct in the previous step, the first figure should smack right into the second figure, knocking them both down and giving you a beautiful two-for-one combo! In this case, both figures would have flown off the edge of the playing surface, but for the rails on my table. But what if your opponent has bunched figures up together?
POWER STRIKING
Setup

This time, you'll want to get your striker up nice and close to the heaviest figure in the group. This may take a few Tix to accomplish properly, but it should be worth the effort. Note that Shooter Obi-Wan (40 points) is heading a group including a Super Battle Droid and a Clone Lieutenant (20 points each).
Twist

For pure power striking, make sure the striking surface covers as much of the lead figure's body as possible. Also, keep the striking surface perfectly parallel to the lead figure's body to ensure that the force of the strike is distributed as evenly as possible to the other two figures, as well.
Result

If you've kept the striking surface as close to the lead figure as possible, you should be able to knock down all three figures, if your striker is powerful enough. The Clone Lieutenant fell off the table shortly after this picture was taken, and the other two bounced off the rails. A sweet three for one!
And now, you know how to strike like a pro, using only a striker available in the starter set! You know how to put real power in your swing, which will allow you to score multiple kills with one hit, whether your opponent spreads his or her figures out or keeps them together.
STRIKER DEFENSE
Interweaved striking surfaces

The key to defending against a gang of shooters is to bunch your figures up in such a way as to maximize the defensive power of the whole group. In this case, stacking your strikers in a 2-figure-wide column - with the figures with the largest bases in front - is ideal for this purpose. However, because you're dealing with strikers, you can also use each figure's outstretched striking surface to provide further support for each figure. Here, you can see how each Jedi has another Jedi's lightsaber in front of him to maximize stability of the entire group. You should be able to do the same with hand strikers, interleaving the hands to "catch" figures that would otherwise fall. Let's see how this works against heavy fire.
Force blasts
Here, the group of four Jedi faces a pair of Force blasts at 5 Tix away.

One Force blast, directed at Striker Kenobi, does very little to perturb the integrity of the group.

And a second blast directed at Striker Kenobi still doesn't knock down any of the figures. Now the strikers can regroup and knock down the Force blasters mercilessly, probably with just one strike!
Large missiles
The striker group packs itself up again, this time to deal with a pair of large missile shooters.

A single missile shot at Agen Kolar's head doesn't knock anyone down.

Nor does the second missile, which has just managed to spin our intrepid Jedi around a bit. Again, the Jedi can regroup and spank the shooters right off the playing field.
Run from strikers!
However, if your strikers are going to combat other strikers, it's best to keep them spread out as widely as possible. Recall what happens when you pack a bunch of shooters together; the same will happen to even the best packed of strikers.

Observe the mischievous, impish "Baseball Bat Yoda" approaching an unsuspecting group of strikers.

And the damage he has wrought upon them, even though they were standing in their most tightly packed and interleaved group. Hence, when confronted with another pack of strikers, break up and knock them all to the ground with one or two well-placed strikers of your own, then group back up if only shooters remain in range to provide maximum stability to your striker group.
Thursday, June 09, 2005
Obi-Wan Kenobi #31 Tips and Tricks
Obi-Wan Kenobi #31
Guest Reviewer: Stephen
ATTACKTIX CLASS: Leader
STAR WARS CLASS: Jedi
POINT VALUE: 30
SPEED: 12
SPECIAL POWER: Sacrifice (Trooper)
SPECIAL POWER RATIO: 20/26 (77%)
ATTACK TYPE: Striker (Lightsaber)
Starter Kenobi is a pretty good striker figure to get involved in the forefront of a striker team. He's got good striking power behind his saber, and his special power allows you to replace a relatively weak trooper with him. However, his front and back present easy targets that can be exploited during an advance.
You may want to advance Starter Kenobi with his slim profile facing the enemy, but you can also protect his vulnerable areas by having him interleave his blade with those of other striker figures.
Tip for attacking with Starter Kenobi:
Starter Kenobi's waist swivels pretty easily, which allows you to get a lot of power out of his strike. His arm is extended fully out from his body, so he can reach quite a ways. However, his saber is angled upward in its most natural position, so keep in mind that even if you swivel it down when you strike, it'll want to rise up again. His striking hand seems to be resistant to breakage thus far, though.
His strike is powerful enough to take out several opposing figures at once, even if some of them are high-point figures that are grouped. You'll need to use a well-placed strike involving both the tip and the hilt of the lightsaber to accomplish this, though.
Because Starter Kenobi's special power is likely to be activated but requires the presence of a trooper, you may want to have a few troopers around, some of which aren't likely to see action soon. If you use Starter Kenobi as a front-line figure, and he gets knocked down, he can rise again when he replaces one of the rear-guard troopers you've kept behind.
Tips for attacking Starter Kenobi:
A shot to Starter Kenobi's front or back midsection will likely take him out; however, the range at which you'll be able to take him depends on the size of your missile. If you're using a shooter with a small missile, you'll likely need to be around 5 Tix away before having a good chance of knocking him down. However, if you're using a large missile or Force blast, you'll be able to knock him down from even 12 Tix away when you his his front or back. If you're aiming for his side, though, don't bother shooting at him. Starter Kenobi has a very narrow side profile, and even if you hit him, the shot is likely to deflect off his side. Try to reposition your shooter so that you get a bead on his wider front or back.
Starter Kenobi is vulnerable to striker attacks. If you can strike him at his waist underneath his right arm, he'll need little more than a tap to make him go down. However, if you hit him elsewhere, you'll want to use a half-power strike at least to ensure he falls.
Keep in mind that Kenobi can come back if your opponent still has troopers in play. In fact, he'll be able to come back right where the trooper stands. If there's a pack of powerful figures that has only one trooper around them, pick off that trooper so that he has to come back within a weaker pack of figures.
Alternative Strategies
If you're going to lead Kenobi into battle, you might want to make sure he's facing sideways from your opponent's perspective, with his lightsaber pointing back toward your starting line. This will present the smallest target to your enemy while he encroaches on them.
However, if he's part of a striker team, you might take the chance of exposing his wider front or back to interleave his saber with those of other members of a striker team. This tactic, when combined with placing larger figures in front of smaller figures, with the bases of the larger and smaller figures touching, will add surprising stability to a striker team's advance on a pack of shooters or strikers.
Ki-Adi-Mundi #18 Tips and Tricks
Ki-Adi-Mundi #18
Guest Reviewer: Stephen
ATTACKTIX CLASS: Specialist
STAR WARS CLASS: Jedi
POINT VALUE: 20
SPEED: 10
SPECIAL POWER: Rally (Specialist or Jedi)
SPECIAL POWER RATIO: 10/26 (38%)
ATTACK TYPE: Striker (Lightsaber)
Ki-Adi-Mundi has one of the most versatile special powers in Attacktix: He can call either a Specialist or a Jedi back from the defeated pile if his special power is active. His striking range is also tantalizingly long, allowing you to take out multiple enemies at once if he's properly positioned.
Though his speed is a bit slower than other strikers, he still makes a good addition to a striker team, particularly in the rear, where sturdier figures can absorb blasts that would otherwise take him down.
Tip for attacking with Ki-Adi-Mundi:
Ki-Adi-Mundi has a surprisingly powerful lightsaber strike, on account of his long reach combined with his not having robes that would obstruct your fingers while striking. When properly positioned, he can even take out two lighter based figures (20 points or less) at once.
However, if you strike him against a strong opponent more than a few times (e.g., any 40 point figure or Mega), his saber hand very well may loosen or break off. His hand seems to be have the same design flaw as Yoda's: it's attached to the arm by a relatively thin piece of green plastic. After about the fourth time of whacking the AT-RT down with one saber strike (yes, it can be done!), his hand broke off for me. Be sure to have super glue on hand if you plan to use him a lot. Recommended is “Mainstays Projects,” Wal-Mart's house brand. Other brands don't seem to bind Attacktix pieces as well or at all.
Like Agen Kolar, Ki-Adi-Mundi's special power is activated only when other figures of yours have been defeated. Hence, he's often best used as a second line attacker, though his powerful saber strikes will allow you to knock down more powerful figures with relative ease.
Tips for attacking Ki-Adi-Mundi:
Though his long reach is one of his greatest strengths, Ki-Adi-Mundi's wide-ranging stance is also his greatest weakness. He presents lots of easily attacked targets, including his outstretched non-saber arm and a taller head than most. However, it takes more than a simple tap to make him go down; he's better balanced than Agen Kolar. He won't go down easily with a small missile at 5 Tix, but large missiles and Force blasts from even 12 Tix away will take him down nicely when they're aimed at his midsection.
If you're attacking Ki-Adi-Mundi with a striker, you can't just tap him and make him go down like you can with Agen Kolar. Nevertheless, you also don't need to whap him at full power like you do Armored Vader. A good half-power swing should be sufficient to do Ki-Adi-Mundi in.
If there are any other Warriors on Ki-Adi-Mundi's team, try to get Ki-Adi-Mundi down first. That will ensure that even if his special power is active, it won't make a difference. Remember to aim for his midsection, as strikes or shots directed elsewhere may miss or just spin him around, rather than knock him down. However, if you make solid contact with Ki-Adi-Mundi with a large missile or striking implement, he'll likely go down.
Alternative Strategies
Because Ki-Adi-Mundi is not a heavy figure, you'll either want to support him with heavier figures behind him or use him to support heavier figures in front. If you choose the latter, you might want to pair him with another saber-wielding figure. Have Ki-Adi-Mundi and the other saber figure's bases touching two figures in front, and have their lightsabers resting on the backs of the opposite figure in front, like this (KAM is Ki-Adi-Mundi, and the Xs are other figures):
X X
X==KAM
Alternatively, if you play with Shaak-Ti, you will likely want to keep Ki-Adi-Mundi in your backups. If Shaak-Ti falls, she can summon Ki-Adi-Mundi, allowing him to join the fray with any other soldiers you may have left behind. Then if he goes down and his special power is active, he can call Shaak-Ti back into the game...and so on.
SFX's Toy Shop - Jar Jar Binks Concept Figure
Sean, from the Attacktix Forum, is a madman. He has created some great concept toys, so I decided to post them here for everyone to see. Thanks for the inspiration!
Hey gang, welcome to the Toy Shop!
As you can tell by the great threads about game play variations and future figures, Attacktix lends itself to creativity. I've had a few ideas rattling around for awhile and I thought I'd share them with you. Think of them as figure mods, but instead of paint & clay I'll use ones & zeros.
First up I thought I'd tackle the dilemma that is... JAR JAR BINKS! That's right... I said it! I was inspired by the Jar Jar poll and thought that there had to be a way to get people to play a J.J.B figure. Unlike most I don't hate the fella. He's not one of my favorites, but I don't want to see him die in some horribly gruesome way. He was a character that had a lot of potential, but was handled poorly.
When thinking of a Jar Jar Attacktix figure the worlds 'striker' and 'launcher' don't jump immediately to mind. So, what could the Jar man do? Here's my take on it. I give you...
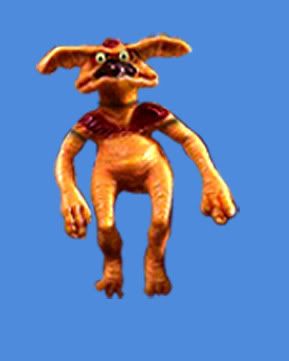
JAR JAR BINKS
(original photos via Rebelscum.com)
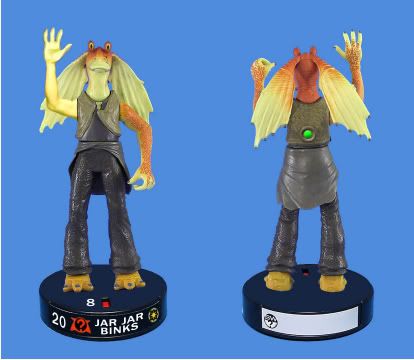
Jar Jar has 2 major features...
1. ARM/LEVER
2. COLOR WINDOW
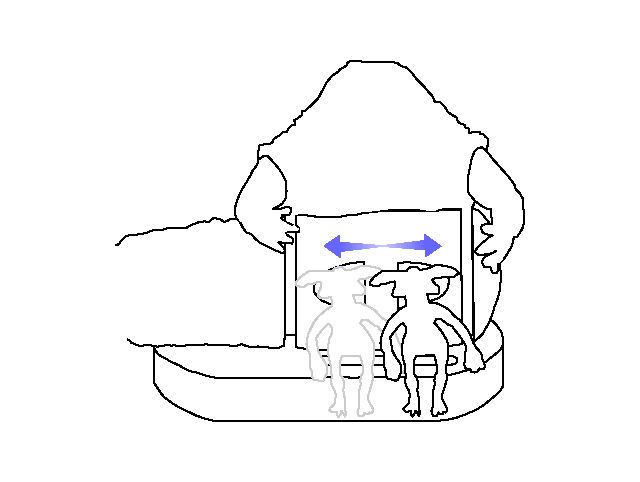
How does he work?
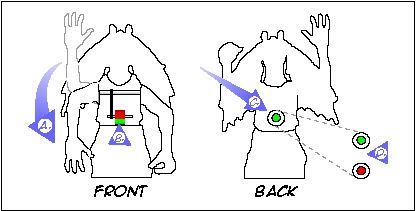
A. by pulling down on the ARM/LEVER you cause the...
B. COLOR WHEEL (red/green) to spin
C. the COLOR WHEEL can be seen through the COLOR WINDOW
D. when the COLOR WHEEL stops your color is revelaled
What does this all mean?
In the Phantom Menace I found Jar Jar to be very distracting (and since you can't add an 'annoyance' or 'murderous rage' variation into the game) I figured I'd work this angle on his figure.
You field Jar Jar on your team just like any other figure. He moves when your team moves, but never takes any other action during your turn. Instead, after your opponent moves his figures, but before he fires a shot you get to 'spin the wheel' and turn Jar Jar's arm. If the color in the window is green your opponent can fire at will. On the other hand, if red appears in the window you opponent must direct his/her entire allotment of shots for that turn at Jar Jar!
Think of him as the anti-R2 D2 (the R2 attacktix figure is rumored to have a numbered spinner that can give your team extra shots). This way Jar Jar fills out 2 very important functions. One he is actually a useful (and hopefully fun) figure. And two, everyone will have the chance to unload a barrage of missiles at his squishy head!
This way you can actually build strategy around him. From the simple and obvious: Send Jar Jar as far away from your main force as possible and let him take some heat. To the more useful: Surround him with a wall of battle droids. The more your opponent knocks over, the more you may be able to pull in from your backups. To the ones that will piss people off: Place him behind a Mega and let them absorb all of your opponents missiles (and frustration)!
Plus, I don't want there ever to be an Attacktix figure that makes people respond in any of the following ways:
Cry
or
Immediately tape the booster back up and return it
or
Feed him to the family pet
or
Death by bunsen burner
or
Crush him like an ant under your boot! ;)
Well, that's it for today's Toy Shop! Join us next time for...
JABBA THE HUTT: MEGA
Hey gang, welcome to the Toy Shop!
As you can tell by the great threads about game play variations and future figures, Attacktix lends itself to creativity. I've had a few ideas rattling around for awhile and I thought I'd share them with you. Think of them as figure mods, but instead of paint & clay I'll use ones & zeros.
First up I thought I'd tackle the dilemma that is... JAR JAR BINKS! That's right... I said it! I was inspired by the Jar Jar poll and thought that there had to be a way to get people to play a J.J.B figure. Unlike most I don't hate the fella. He's not one of my favorites, but I don't want to see him die in some horribly gruesome way. He was a character that had a lot of potential, but was handled poorly.
When thinking of a Jar Jar Attacktix figure the worlds 'striker' and 'launcher' don't jump immediately to mind. So, what could the Jar man do? Here's my take on it. I give you...
JAR JAR BINKS
(original photos via Rebelscum.com)
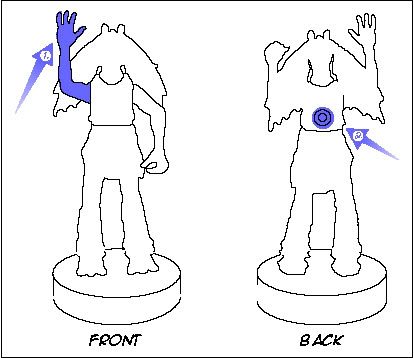
Jar Jar has 2 major features...
1. ARM/LEVER
2. COLOR WINDOW
How does he work?
A. by pulling down on the ARM/LEVER you cause the...
B. COLOR WHEEL (red/green) to spin
C. the COLOR WHEEL can be seen through the COLOR WINDOW
D. when the COLOR WHEEL stops your color is revelaled
What does this all mean?
In the Phantom Menace I found Jar Jar to be very distracting (and since you can't add an 'annoyance' or 'murderous rage' variation into the game) I figured I'd work this angle on his figure.
You field Jar Jar on your team just like any other figure. He moves when your team moves, but never takes any other action during your turn. Instead, after your opponent moves his figures, but before he fires a shot you get to 'spin the wheel' and turn Jar Jar's arm. If the color in the window is green your opponent can fire at will. On the other hand, if red appears in the window you opponent must direct his/her entire allotment of shots for that turn at Jar Jar!
Think of him as the anti-R2 D2 (the R2 attacktix figure is rumored to have a numbered spinner that can give your team extra shots). This way Jar Jar fills out 2 very important functions. One he is actually a useful (and hopefully fun) figure. And two, everyone will have the chance to unload a barrage of missiles at his squishy head!
This way you can actually build strategy around him. From the simple and obvious: Send Jar Jar as far away from your main force as possible and let him take some heat. To the more useful: Surround him with a wall of battle droids. The more your opponent knocks over, the more you may be able to pull in from your backups. To the ones that will piss people off: Place him behind a Mega and let them absorb all of your opponents missiles (and frustration)!
Plus, I don't want there ever to be an Attacktix figure that makes people respond in any of the following ways:
Cry
or
Immediately tape the booster back up and return it
or
Feed him to the family pet
or
Death by bunsen burner
or
Crush him like an ant under your boot! ;)
Well, that's it for today's Toy Shop! Join us next time for...
JABBA THE HUTT: MEGA
Subscribe to:
Posts (Atom)