Friday, December 30, 2005

Web of Webhead - Top 05 of '05

web of webhead Episode III: Top 05 of '05

Welcome back to web of webhead. Our first two installments covered two of the factions in Star Wars Attacktix (SWAX), the Droid Army and the Wookiees. This time around I’m going to give you my picks for the top five figures of 2005, encompassing Series 1, Series 2, the Megas, the Battle Pack and Battle Case. Keep in mind these are MY opinions, and I hope this encourages discussion. Let’s get it on!

Honorable Mention:

Clone Sergeant (SW/35)


The Clone Sergeant is the figure exclusive to the Battle Case, and hence, is something of a chase figure due to the fact that the Battle Case is both hard to find in some places, and sort of expensive to collect in multiples. The Clone Sergeant makes the list because he has the fastest speed of any Launcher in the game, by a good amount. You can say that the Republic Gunship in theory moves faster and shoots, but that’s an apples to oranges comparison. No other figure on a round base that shoots comes close to his speed. His special is remarkably flexible as well, as it works with Clone Troopers by name, not by class, giving you a lot of flexibility when team building. However, in the end you have a 20 point figure on a small base with a small missile, which keeps him out of the top five proper.

Number Five:

Destroyer Droid (SW/19)2)


The Droideka is an imposing figure on the battlefield, the only regular sized figure to offer two launcher attacks for one. A Destroyer Droid lets you “cheat” the game limitations by getting in at least one extra attack each turn as long as he is in play. Speaking of staying in play, it has a better than one in three chance of returning right back to your starting area upon defeat as long as one of his droid buddies is around, which is probably better than the Recover power from a Launcher’s point of view. The fact that the Destroyer Droid has only small missiles keeps him from being higher on the list.

Number Four:

Mace Windu (SW/19)


The Series 1 Striker Mace was the one figure singled out by the game's designer as perhaps being made too strong. A 30 point figure on a large base, with a decent chance at Recovering, Mace is a very solid attacker that is hard to take out. The only thing keeping Mace this far down the list is his slow speed, with more and more 12 speed strikers out there, a 10 speed striker just seems a little passé.

Number Three:

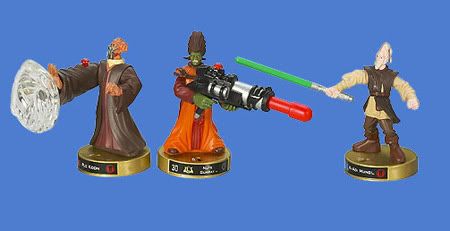
Ki-Adi Mundi (SW/G2)2)


The new Gold Based Ki-Adi is getting a lot of hype right now, and rightfully so. A fast, cheap Jedi striker on a medium base, Ki-Adi is aggressively costed for his base stats. However, when you add in one of the best, if not the best Special Powers in the game, you get an outstanding figure. The threat of a possible TRIPLE Jedi Attackback makes Ki-Adi the number one target in most games he appears in, allowing you to develop the rest of your figures accordingly.

Number Two:

General Grievous (SW/28) & (SW/T3)


Grievous is a powerful precision shooter, with the best missile in the game. More to the point, Grievous is the BEST shooter in the game in my opinion. He has a good cost, a powerful attack, and one of the better specials in the game coupled with nearly 50/50 odds, there isn’t much more to say about Grievous except that if you can get the Tournament version, you get all of this for 10 less points. A steal.

Number One:

Darth Vader (SW/16)


This is the one pick that I’m sure most people will agree with. “Armored” Vader is quite simply a force to be reckoned with. One of two fastest figures in the game at 14 speed, Vader is probably “broken” when it comes to any Capture the Flag scenario. Add to that his weight and base size, making him harder to topple, and cap it off with a special that lets him Recover almost 2/3’s of the time, and you have the best, most aggressive striker in the game combined with being about the hardest to kill. Not much more left to say about that.

More Best Of:

Best Mega: AT-RT (SW/37), at 4 attacks per turn, this lone figure doubles your normal number of shots, allowing you to get five attacks in a turn if you wish. Oh, and his special could let him bring in his little brother, the Destroyer Droid in a pinch.

Best Wookiee: Tarfful (SW/29), the king of all Wookiees, the Vader of Wookiees, whatever you call him, he’s a beast.

Best Separatist: Cone Commander (SW/34), this starter figure is a well rounded shooter, with an extremely high chance of giving one of your Troopers *cough* Destroyer Droid *cough* a free shot.

Best Empire: Scout Trooper (SW/4)2), soon to be upstaged to be sure, but a decent “filler” character that benefits your Troopers, and has an above average special power ratio for 10 pointers.

Best Rebel: Luke Skywalker (SW/29)2) is one of the best figs in the game... no, really. Probably my “number seven” pick, he has great speed, a great mid sized base for a low cost, and a good chance of having his very versatile special “go off”.

Best Bounty Hunter: Bossk (SW/13)2) has probably the number one best special in the game. Unfortunately, it won’t come up very often, leaving a fairly basic (though left handed) shooter.

Best 10 Pointer: Grievous Bodyguard (SW/6)2), with speed enough to keep pace with all but the fastest strikers, and a good special that fires off fairly frequently for the cost, an all around good figure for the points.

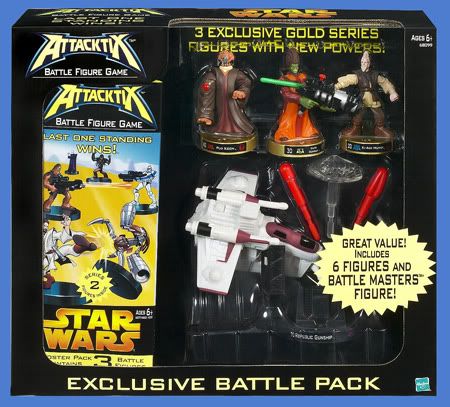
Best non-booster product: Wal-Mart exclusive Battle Pack, a great bargain with a Series 2 booster (about 7 – 8 bucks), a Republic Gunship (about 10 bucks) and three nice Gold Based figs, all for around 20 dollars. A great set for someone first getting into the game.

Best starter: Series 1 (Vader versus Kenobi). This of all the starters I like best because it gets right down to the crux of Episode III and gives you the major players, a great introduction to the game.

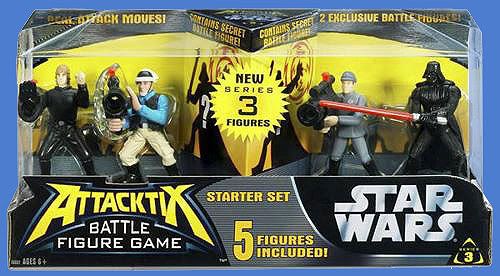
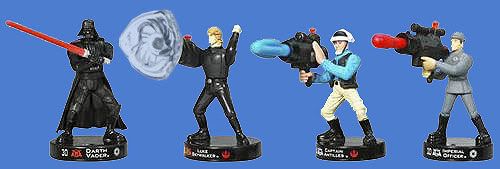
That’s it for this year. As good as this year was, I have a feeling the Sophomore year of Attacktix will really tell the tale, with Series 3 on the horizon and Transformers Attacktix on it’s way, it should be a good one. See you next time!

Read more web of webhead Episodes I & II


In response to webhead's post, Stephen would also like to add HIS best of list.

Honorable mention: Yoda (SW/30)
If you're a person who likes to play a defensive striker game, Yoda is your guy. His defense is excellent, being very hard to knock down form all but a few Tix away, and his special power means death for the figure that strikes him down more than three-fourths of the time. His speed is also excellent, which allows you to control the playing field with him against all but the fastest strikers. However, his awkward strike tends to "top off" opponents' figures, rather than propel them in a straight line. Thus, it's harder to pull off multiple kills with Yoda than with other strikers, particularly if his hand is glued to his lightsaber.

Fifth place: Destroyer Droid (SW/19)2)
Because the Destroyer Droid has an extra-stable tripod stance, two missile shooters, and a Trooper Attacktix class, it makes a fabulous support figure for a Droid Army team. Why only a Droid Army team? Because it has about a one-third chance of returning to the starting line only if a Droid Army figure remains standing on its team. However, its 40 point cost, combined with its firing only small missiles, makes it an awfully expensive bit of laser-bait. Especially because the skinny panel joining its arm and legs is a guaranteed push-down target that can let even a small missile shooter take down the Destroyer Droid from 15 Tix away.

Fourth place: Gold-based Ki-Adi-Mundi (SW/G2)2)
Yes, Ki-Adi-Mundi's refurbishment is by far the best of the three in the Battle Pack. Not only does his special power get upgraded in power and probability, but his movement gets bumped up 2 Tix, adding a needed burst of speed to this powerful striker. In contrast, gold-based Nute Gunray's special power upgrade (though a lovely add to the Droid Army) is still wedded to a small missile shooter. Nevertheless, a three-Jedi Attackback is only useful if there are a) up to three Jedis b) in good attack range. Thus, you'll need to keep gold-based Ki-Adi-Mundi out of the range of your opponent's attacks for at least one turn (and possibly two or three) so that his special power won't be triggered prematurely, thus wasting his speed. Alternatively, he might make a good back-line figure in a striker unit – but then, the figures in front of him might be decimated before his special power becomes useful. Plus, his saber hand still tends to snap off at the wrist; unfortunately, Hasbro didn't glue it in any better than they did in the Series 1 issue.

Third place: General Grievous (SW/28) & (SW/T3)
This guy's a monster on the battlefield. His wide-hitting bolt is to be feared, and his amazing ankle flexibility allows him to bend forward or backward so that he's almost parallel with the playing field, allowing him to aim and fire around figures or terrain that would otherwise block his shot. Plus, at 30 points, he doesn't break the point bank on 100-point squads. And to top it off, his Attackback special power lets a couple of Droid Army figures take their revenge, should their Captain fall. However, the same provisos about Ki-Adi-Mundi's special power apply here, making General Grievous an obvious target for opening salvos from your opponent, particularly if he's left alone on the starting line. The trigger on his gun is also awkwardly recessed into the gun itself, making firing an issue for those who aren't used to it. The Tournament edition General Grievous knocks 10 points off his cost, but it also knocks 2 Tix off his speed, which makes him perhaps the least advantageous Tournament figure compared to the regular figure.

Number two: Obi-Wan Kenobi (SW/38)2)
When I saw the special power probabilities on the Series 2 Mace starter, I grew rather pessimistic that Series 2 Starter Kenobi's Recover power would have anything close to a 50% probability of coming up. However, when it was posted that his Recover power was only 8% less probable to come up than Series 1 Starter Kenobi's Sacrifice power, and the orange Clone Trooper in the starter set had a more probable Jedi Attackback, I got a bunch of these starter sets for myself. With his saber pointed inward, this 30-pointer Jedi Warrior can knock down as many figures as Mace Windu, and his Recover probability (which requires only a lowly, cheap Trooper to activate) is slightly higher than even Armored Vader's! So why is he only number two on this list?

Number one: Darth Vader (SW/16)
Because only 10 more points and a slight hit to the Recover probability buys you a bigger base, a more substantial figure, 2 more Tix of movement (making him the fastest figure in the game), and a longer and more powerful strike. Armored Vader's Recover special power also requires only a Trooper to activate, which he can leave behind while he charges through your enemy's lines, knocking them down mercilessly while taking hits from small missiles with impunity. For now, this guy is the striker to include at least one of in a squad, particularly if he's paired with another fast, lower point striker (Starter 2 Kenobi, perhaps? Count Dooku?).


Best of the Rest

Best Mega: Republic Gunship (SW/31)2)
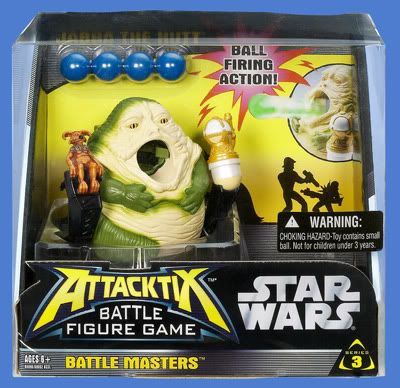
Not only does it offer a portable large missile launcher, it lets you transport a figure across the battlefield. Furthermore, the new targeting mechanism makes it harder (but not impossible) to take down with a single attack. The new targets are also not prone to popping back into place (like the AT-RT's and Boga's) after they've been knocked down. They seem to be so successful that they'll be used on the Jabba the Hutt Mega for Series 3.

Best Republic: Medic Droid (SW/20)2)
A unique figure that brings any figures of yours back from the dead. This figure's unique action is almost guaranteed not to break – and even if it does, you can just use a counter or something similar to keep track of when to bring a figure back – no need to play the booster return lottery with Hasbro! However, this may not be terribly useful in 100-point games without figures surrounding it to protect it.

Best Rebel: Luke Skywalker (SW/29)2)
Yes, his foot is covered in something, but that something helps to keep him up, even with direct shots at his base. Plus, he gives the nascent Rebel team a lot of mobility from the start and a relatively cheap yet effective striker.

Best Wookiee: Tarfful (SW/29)
The paw with the most punch, the Wookiee with the wickedest whap, the longest-lasting Leader (medium-probability Recover special power): It's Tarfful, an indispensible Wookiee team anchor.

Best Separatist: Palpatine (SW/17)
Hard to knock down, equipped a unique Force blast and a medium-probability Recover special power that belies his Sith origins, and featuring a fixed firing angle, Palpy is a great figure to learn about the basics of (Force blast) Attacktix shooting. Plus, if he's knocked down on his right side, his Force blast might just have a nasty surprise for your figures that lie in front of him!

Best Empire: Royal Guard (SW/07)2)
The Empire is probably the weakest team so far; expect this to change greatly in Series 3. The Royal Guard wins over the first Imperial Vader because of its higher speed, lower cost, and better special power (Rescue vs. Force Push?!?).

Best Bounty Hunter: Boba Fett (SW/30)2)
It's almost hard to take this figure seriously, particularly if Tion Medon has snuck up behind him and is about to give him a nice thwack on the bottom. Still, his low center of gravity when he's bent down makes him hard to knock over (like Yoda), and his Capture special power is more probable than Bossk's. Furthermore, if you have some Specialist Scout Troopers on your team (or some other Bounty Hunters), his special power will act just like Bossk's.

Best 10 point figure: Jedi Knight (SW/01)2)
My prejudice may be showing through on this one, but hear me out. Unlike the Series 1 or 2 Grievous Bodyguards, 10 Jedi Knights' Attackback special powers work together when thrown together in a squad. Furthermore, their strike is more powerful than that of a Grievous Bodyguard, and they're just as fast as a Series 1 Grievous Bodyguard. If you get these guys swarming together in two flanks of five (or four, if your opponent goes first and knocks two off the starting line), you've got a force that's nearly unstoppable if you peel off attackers from one flank and keep the other flank formed up tightly.

Best novelty product: Wal-Mart Battle Pack
A Republic Gunship ($9.96), a Series 2 booster pack ($6.97), and three gold-based figures (at least $9.99 on eBay) for between $18-$22? What a great way to introduce the game to newbies! Even the two-for-one Series 2 booster Mega Packs won't give you as thorough an introduction to the game as the Battle Pack (though they're better for building armies or building up trade bait).

Best starter: Series 1 (Kenobi vs. Vader)
Though individual figures in Series 2 starters (Mace starter Clone Commander, Starter 2 Kenobi) might be better than individual figures in the Series 1 starter, this first starter pack gives some decently powered figures on both sides of the Star Wars universe to start up epic battles. I have 6 of them, at least.

Worst figures: 30 point, small missile shooters without gold bases
Without some incredibly potent and probable special powers, these figures will almost always be relegated to the trade/dust heap. They can't knock much down from a distance, and they tend to be built so that they're not too hard to knock down. Series 1 had three of these clunkers (Padme Amidala, Bail Organa, Nute Gunray), and Series 2 had only one (Princess Leia). C'mon, Hasbro! Do you think politicians can't handle powerful guns for some reason? Give the ladies, senator, and viceroy some credit. Give 'em either the big guns or the big special powers if they've got a big point cost. The gold-based Nute Gunray did the latter, which would make me happy enough to play him in the rear of a Droid Army squad. As for the rest of these...well, let's just say I won't be playing a Senate team featuring the fearsomely bad Padme-Bail-Leia trio anytime soon.

Darth Sidious #25-2 Tips and Tricks

Darth Sidious #25-2
Reviewer: Stephen


ATTACKTIX CLASS: Leader
STAR WARS CLASS: Sith
POINT VALUE: 30
SPEED: 8
SPECIAL POWER: Recover (Sith or Separatist)
SPECIAL POWER RATIO: 16/26 (62%)
ATTACK TYPE: Striker (Lightsaber)


Darth Sidious is a bit slow in advancing up the field, but if you're able to strike in spite of his hanging robes, he can smack your opponent's figures down quite effectively. You can also rotate his left arm immediately in front of or behind his head so that his robe doesn't impact your swing nearly as much.

Sidious's ability to Recover from being taken down makes him a formidable enemy, particularly given its high probability of coming up and its ability to use either Sith or Separatist figures to bring Sidious back from being defeated. As long as you've got a team of naughty figures supporting him, Sidious may be a force on the playing field for quite a while.

Tip for attacking with Darth Sidious:
Darth Sidious's flowing sleeves can be a pain in the rear. They droop down and can impair proper striking technique in a nasty way. Thus, I highly recommend rotating Sidious's arms up to get his sleeves out of the way. Put his left hand behind his head so that his left sleeve sticks almost straight up, and align the hilt of his saber with his neck. He'll only knock down a couple of figures in a four-figure group (or 30- and 40-point strikers and Force blasters) this way, but it makes for a robe-free strike. If you can get your right hand's fingers out of the way of his striking sleeve, align the hilt of his saber with his waist line (or a bit lower); he can knock down four tightly-packed 30- and 40-point strikers and Force blasters this way.

Sidious is the Sithergizer bunny: he keeps going and going and going...with lots of different figures that will support him. Make sure you have as many Sith and Separatist figures on Sidious's team to give him the best chance of popping right back up after being knocked down.

Tips for attacking Darth Sidious:
Sidious isn't quite as solid as his Series 2 apprentice. At 10 Tix, a small missile or Force blast to the upper chest or head will take him down. From 15 Tix away, a well-aimed large missile or Force blast to his top half. A really well-aimed small missile to Sidious's chest can also take him down; however, small missile attacks are likely to be more successful from 5-10 Tix away. It'll take a half-power swing from a striker to knock him down, though a quarter-power swing will scoot him across the table around 5 Tix.

To be sure about taking Sidious down, you'll have to eliminate the Sith and Separatist forces on his team. Fortunately, his slow speed (for a striker) will help ensure that he can take on your strikers only when you're ready for him. Thus, you might want to keep a shooter force back to pick off Sith or Separatist figures on Sidious's team, then close a striker team in for the kill when only Sidious and another figure is left on the team.

Alternative Strategies
Sidious might make an ideal anchor for a second-wave part of a team. If you team him up with Darth Maul, or Series 1 Darth Vader with some Troopers surrounding Sidious, you'll have a team that'll take great advantage of synergistic special powers. Keep a guard of shooters around Sidious to make sure his Recover power doesn't get called upon to act too many times before making a final, devastating series of strikes against an opponent.

Of course, you could always let Sidious lumber his way up the playing field, daring your opponent to take him out. If you back him up with another striker or two, he'll be harder to knock down, and he'll be ready to wade his way through your opponent's figures with relative impunity.

R2-D2 #21-2 Tips and Tricks

R2-D2 #21-2
Reviewer: Webhead


ATTACKTIX CLASS: Specialist
STAR WARS CLASS: Rebel
POINT VALUE: 10
SPEED: 8
SPECIAL POWER: Recover (Rebel)
SPECIAL POWER RATIO: 12/26 (46%)
ATTACK TYPE: None
EFFECT: Numer of Attacks Random(1-4)


R2 is one of Star Wars most recognizable figures, and for a good reason…it’s the only character that is in all six movies in exactly the same form.

We all know that this R2 doesn’t have an attack, so, does his Effect and Special Power make up for it? Let’s see…

Tip for attacking with R2-D2:
Moving right along…

Tips for attacking R2-D2:
R2’s effect reads as follows: "At start of your turn, you may press R2’s Top. Window shows number of attacks you can make this turn." Pretty straight forward. First, a note, that when you press the antenna, the wheel starts to spin, when you release the antenna, the wheel stops and locks into place. To my mind, only once the antenna is released and the wheel locked do you have your number, as the wheel may stop spinning on it’s own and stop between two numbers.

So, the rulebook claims that you have a 50-50 chance of R2 giving you more attacks for your turn. But is this accurate? Not really, let me explain why. According to the Attacktix Autopsy: R2 that Joe has done, it has been revealed that the wheel in R2 has six numbers on it, 1, 1, 2, 2, 3, and 4 (not in that order). There is no indication that anything would make one number come up more than another. So, let’s divide those numbers into three categories. The first category is “Less attacks than normal” (the two 1’s), the second is “The normal number of attacks” (the two 2’s), and the third is “More attacks than normal” (the 3 and 4). “That’s great,” you say, “but what does it all mean?” What is means is this, if you use R2 every turn, one third of the time you will lose attacks, one third of the time he will have no effect on the game at all, and one third of the time he will give you a positivie, more attacks than normal. Now, is it worth having a 10 point figure that can only help you out a third of your time? It really all depends on whether or not you feel lucky, and whether you have a team that can take full advantage of the added attacks. If you spin a 1 on the first turn when all you have is a single launcher that can attack anyway, you haven’t lost anything, but you haven’t gained anything either. Now, if it’s the end-game, and you can wipe out your opponent if you could just get a third attack in, maybe R2 can come through for you. Or maybe he’d spin a 1 again and lose it for you, it’s all a roll of the dice.

Alternative Strategies
R2 can make an interesting piece of “mobile terrain”, he is short enough that some Strikers can attack right over the top of him, knocking over the figure behind him. Don’t be afraid to move R2 out into the field, any attacks spent on him are ones that aren’t targetting your own attackers.

Saturday, December 17, 2005

Attacktix Battle Case ONLY $10!

Great last minute Christmas deals at Walmart!

Get your Battle Cases HERE! Only $10

Series 2 is available as well in TWO-Packs for $13.94. Click the link below!


Monday, December 12, 2005

Luke Skywalker #29-2 Tips and Tricks

Luke Skywalker #29-2
Reviewer: Stephen


ATTACKTIX CLASS: Warrior
STAR WARS CLASS: Rebel
POINT VALUE: 20
SPEED: 12
SPECIAL POWER: Attackback (Republic or Rebel)
SPECIAL POWER RATIO: 16/26 (62%)
ATTACK TYPE: Striker (Lightsaber)


Luke Skywalker looks like he's stepped in something...unpleasant. However, he's a surprisingly good striker, especially for only 20 points. He also plays nicely with either the Republic or Rebel teams, which makes him a useful addition to either faction.

Tip for attacking with Luke Skywalker:
Like Kit Fisto, Luke Skywalker's saber can be used to strike at chest level, or in front of or behind his right hip. Using the front-hip strike often allows for the most power in his strike, and he can take out 3-4 of 4 tightly packed 40-point Force blasters with it.

Luke's special power creates a nice link between the PT and OT, as he can grant either the Republic or Rebel figures on your team a free move and attack.

Tips for attacking Luke Skywalker:
At 10 Tix away, a small missile to his chest or back will knock him down. At 15 Tix away, a large missile or Force blast to the back or base will take him down; however, these shots to the chest are less likely to knock him down. Also, a quarter-power swing will often suffice to knock him down with a striker.

Luke's cosmopolitan special power allows a wide range of figures to benefit from it, so you'll likely not want to try timing a Luke kill – unless, of course, he advances on you quickly and leaves figures behind that can't take maximal advantage of his special power! Thus, he might make a good target for a first volley of shots a the beginning of the game.

Alternative Strategies
That said, with Luke Skywalker leading a forward squad of Republic or Rebel strikers or faster shooters against your opponent, you might be able to close quickly enough so that if Luke gets knocked down, his special power will ensure that he's avenged. And if he's not knocked down, he'll be able to wreak quite a bit of havoc on your opponent's forces with his powerful strike.

In any case, you probably don't want to leave Luke as part of a rear guard squad (unless, of course, it contains a substantial number of Republic or Rebel figures). If he gets knocked down in the back of the field, his high-probability special power won't do much good.

Darth Maul #26-2 Tips and Tricks

Darth Maul #26-2
Reviewer: Stephen


ATTACKTIX CLASS: Warrior
STAR WARS CLASS: Sith
POINT VALUE: 30
SPEED: 10
SPECIAL POWER: Vengeance (Jedi if have Leader)
SPECIAL POWER RATIO: 14/26 (54%)
ATTACK TYPE: Striker (Dual-Bladed Lightsaber)


Darth Maul is perhaps a less power figure than his dual-bladed lightsaber might suggest. However, he still has two different modes of striking that have significant consequences both for the kinds of combination shots you can perform and for his ability to withstand attacks.

His special power will make your Jedi rue the day they ever saw Maul about half of the time, but only if Maul has a Leader supporting his attacks. Thus, his Master...err...Leader will be a prime target for attacks.

Tip for attacking with Darth Maul:
Darth Maul's double-bladed saber positioned at the chest level requires some more advanced striking skill than a novice may possess. When I try to strike with my left hand in its normal striker support position, the left side of Maul's saber hits the knuckles of my left hand before the saber has much of a chance to whip around much in its strike. Hence, I have to hold Maul's base much lower, with my hand almost flat against his base. In this way, I can strike down 3 of 4 tightly grouped 40-point Force blasters with the right side of Maul's saber. You might be able to claim an additional figure if there's a way for you to snake the left blade of Maul's saber behind the back of a 30-point or lower figure of your opponent's.

If you're less familiar with striking (or just can't get Maul's saber to work for you), you may want to keep his saber lifted over his head and strike with the right side of the saber alone. This is a somewhat less powerful strike than when his saber is at chest level, but it will still take out 3 of 4 tightly grouped 40-point Force blasters. If you use this strike on a single figure, the figure will be sent spinning head over heels and popped upward somewhat (like with Darth Vader's overhand strike, but not as far up in the air). This can interfere with doing straight combination kills, but it can make for some interesting trick combinations (e.g., skipping one figure over another to hit a third, more valuable figure farther behind the second one).

Tips for attacking Darth Maul:
Darth Maul's vulnerability depends greatly on the position of his saber. With his saber raised above his head, at 10 Tix away, a small missile to his back (but not his chest) will knock him down. At 15 Tix away, a large missile or Force blast to the back or chest will take him down nicely. Additionally, a Force blast to the saber he holds on his right side will often be sufficient to twirl him down, even at 15 Tix. Also, a quarter-power swing will often suffice to knock him down with a striker.

However, if his saber is down at chest level, a small missile even at 5 Tix away will likely not be able to knock him down, no matter where it's aimed. Furthermore, only at 5 Tix away can a large missile have a strong chance of taking him down. At 10 Tix away, a Force blast can take him down, but from 15 Tix away, unless you can get a *really* lucky shot on his lightsaber, even a Force blaster can't take him down with his saber at chest level. Furthermore, you'll need at least a half-power swing to strike him down.

Maul's special power will ensure that your favorite Jedi is toast about half of the time...but only if your opponent has a Leader in play. Thus, to protect the Jedi on your squad, you should take out your opponent's Leaders before taking on Maul. However, if Maul's on the field, you might also want to limit the number of Jedi in your squad.

Alternative Strategies
Darth Maul's strong defensive capabilities make him a useful choice for a first-line striker, particularly with his saber down at chest level. When properly used, he can maraud through your non-Jedi opponents, and when he is knocked down, he can exact his Vengeance on the peskiest Jedi on the field for your opponent. Just make sure you have a Leader left on your team!

However, his slower speed might make him suited for the lead of a secondary advancing squad (perhaps protecting a Leader in the rear). You might then want his saber extended above his head to put some spin on your opponent's figures as they crash into each other, once they've been spread out by an initial attacking force.

Transformers Attacktix - First Look

Thanks to the Transformers World 2005 forum. Attacktix Tactics will always be covering any and all news in the Attacktix world, so if you have any more info about these prototypes, please leave a comment below!

Attacktix Transformers Battle figure game
24 different figures available.
Available June 2006.
Works with Star Wars Attacktix.


Thursday, December 08, 2005

New Series 3 ATTACKTIX Coming in January 2006

From Hasbro.com

New Series 3 ATTACKTIX Coming in January 2006 - Awesome new battle figures with amazing new powers!

Introducing Series 3 ATTACKTIX, the awesome battle figure game!

Series 3 includes a brand-new Starter Set, containing two exclusive figures with powers you won’t find anywhere else, plus a hidden common figure from the Booster Packs. The Series 3 Starter Set includes:

  • Luke Skywalker with Force Blast attack and Rescue ability
  • Darth Vader with Lightsaber attack and Sacrifice ability
  • Captain Antilles with Launcher attack and Rally ability
  • Imperial Officer with Launcher attack and Charge ability

New Series 3 Booster Packs are coming as well, with a cool new look! Be on the lookout for three different packaging versions. Series 3 features 30 new, classic Star Wars trilogy ATTACKTIX battle figures with new powers. Each Booster Pack includes three randomly-selected figures – one common, one rare and one super rare figure. And keep your eyes out for those ultra rare silver bases!

Download the ATTACKTIX play guide and see all 30 ATTACKTIX Wave 3 booster pack figures and rarity checklist!

The new ATTACKTIX Series 3 Battle Master features awesome launching powers! Jabba the Hutt shoots marbles at your enemies and features a Recruit ability when defeated – if the ATTACKTIX window is white, put a Bounty Hunter into play from your back-ups!

ATTACKTIX Starter Sets, Booster Packs and Battle Masters are available where action figures are sold.

Monday, November 28, 2005

More Attacktix Series 3 - Starters and JABBA Mega

Rebelscum.com always get the hottest news! Today they have some images of the latest Attacktix. Series 3 will feature a Jabba the Hutt Mega, with Ball Firing Action. I wonder if he will come with blue, like in the box, or green, like in the product picture.

Also, a Series 2 Starter will include Force Blast Luke, Captain Antilles, Imperial Officer, and more Darth goodness - two-handed lightsaber! I can not wait!


Sunday, November 27, 2005

Custom Attacktix

ATTACKTIX CUSTOMS

Darklighter, Biggs [Joe Manzo]
Durge [Joe Manzo]
Gree, Commander [punisherad]
Jinn, Qui-Gon [warlordofmars]
Kenobi, Obi-Wan (Old Ben) [Joe Manzo]
R2-Q5 [Joe Manzo]
Secura, Aayla [Joe Manzo]

CONCEPT FIGURES

Hey gang, welcome to the Toy Shop!

As you can tell by the great threads about game play variations and future figures, Attacktix lends itself to creativity. I've had a few ideas rattling around for awhile and I thought I'd share them with you. Think of them as figure mods, but instead of paint & clay I'll use ones & zeros.


For those of you that like to see some awesome conceptual figures, just follow the links below for a good time!

All figures from the imagination of SFX5000

If you have any suggestions for a custom or concept figure you would like to see, or if you would like to submit one of your own please email me or leave a comment! For those of you that have expressed interest in purchasing a custom, they are generally not for sale, but you can email with your price and hope for the best.

Custom Attacktix - Durge

Durge

[image]

[image]

[image]

[image]

[image]

ATTACKTIX CLASS: Specialist
STAR WARS CLASS: Bounty Hunter
POINT VALUE: 30
SPEED: 6
SPECIAL POWER: Recover (Dooku)
ATTACK TYPE: Shooter (Large Missile)

Durge is a repainted Jango Fett, with a carved Utapau Warrior head. I sliced off the jet pack, and removed the rocket. Then I glued it back on, upside down so it looks a little more like what you see on Durge (in the Star Wars Databank pictures). I'd like to get two more Clone Troopers and equip him with two guns. I'll probably raise his value to 50 at that point. Also, if I get a second Striker Greivous, I will remove his shoulder bells and add them to Durge, so I can add a little more detail to his paint job.

Saturday, November 26, 2005

Custom Attacktix - R2-Q5

R2-Q5

[image]

[image]

[image]

[image]


ATTACKTIX CLASS: Specialist
STAR WARS CLASS: Empire
POINT VALUE: 10
SPEED: 8
SPECIAL POWER: Recover (Empire)
EFFECT TYPE: Free Move (Variable)

R2-Q5 is a repainted Yoda. Ok, he is a repainted R2-D2, but that's no shocker. My first R2-D2's spinner stopped working, so I decided to pop him open, and see what made him tick, or spin. So I did that, and I am still not sure exactly why he wouldn't spin, but I did fix up the springs and get him to spin about 80% of the time. I pasted over the old number strip that R2 had inside, and put a strip of all the Attacktix Classes. So on a balanced team, you may get a move almost every turn. But I rarely play a team that has one of each class, so I left his value at 20. Just for fun, I cut away the two pieces of plastic that held the legs in place, leaving them only attached at the shoulder. This R2-Q5 can now spin at the shoulder, but it does little for his defense. I was hoping it would help absorb some of the blow, but it still goes down like R2-D2.

Custom Attacktix - Biggs Darklighter

Biggs Darklighter

[image]

[image]

[image]

[image]

ATTACKTIX CLASS: Specialist
STAR WARS CLASS: Rebel
POINT VALUE: 20
SPEED: 4
SPECIAL POWER: Attackback (Rebel)
ATTACK TYPE: Shooter (Small Missile)

Biggs is a repainted ARC Trooper. I used a face from my Jedi Knight (ala Face-Off) and carved it down until it fit into the helmet. Not much else was altered, besides the paint job, but the facial reconstruction surgery is pretty time consuming. I bumped him up to a 20 point figure for no specific reason. An Attackback for ANY Rebel can be very valuable, plus the Rebel roster is pretty slim, so I just wanted to make the Rebel community a little stronger.

Custom Attacktix - Obi-Wan Kenobi "Old Ben"

Obi-Wan Kenobi

[image]

[image]

[image]

ATTACKTIX CLASS: Leader
STAR WARS CLASS: Jedi
POINT VALUE: 30
SPEED: 12
SPECIAL POWER: Sacrifice (Trooper)
ATTACK TYPE: Striker (Lightsaber)

Old Ben is a repainted Dooku face glued into a Jedi Knights hollowed-out hood. I also secured him onto a Starter Kenobi's base, keeping all stats intact. Since he is a striker of equal size, he works well in game, I don't see anything unfair. I may change his SW Class to Rebel, just to have some more depth in that class.

Sunday, November 20, 2005

Attacktix Battle Pack - Stats Revealed

The Battle Packs are now showing up at Walmarts (the ONLY place you will find them). Thanks to Jay, for getting us the info on the Special Gold Base Stats.

Ki-Adi Mundi:
Speed - 12
Cost - 20
Specialist
Jedi
Attackback if white: Free move and attack for up three of your Jedi

Nute Gunray:
Speed - 6
Cost - 30
Leader
Droid Army
Rally if white: Return up to two of your defeated Droid Army figures to play

Plo Koon:
Speed - 4
Cost - 40
Warrior
Jedi
Recruit if white: Put Kit Fisto into play from your back-ups

Thursday, November 17, 2005

Attacktix Series 3 Sneak Peek

While I was away on my Honeymoon (which was fantastic) Rebelscum.com posted some early pictures of Attacktix Series 3 figures and the new Booster Box design. The three figures shown here are; Luke in Rebel Disguise, Rebel Trooper and Tusken Warrior with (possible?) combo striker/launcher Gaffe Stick!

I have included them here for you to see. Now that I am back, look forward to my reviews of Han and Chewie, from Series 2, along with a few more from our guest reviewers! Also, a new contest will be heading your way via the Attacktix Forum and I will be posting a few of my customs.

It's been a busy week for me AND the Attacktix World, but I am going to try to get all of us caught up.

Click for full size


Thursday, November 10, 2005

Darth Vader #17-2 Tips and Tricks

Darth Vader #17-2
Reviewer: Stephen


ATTACKTIX CLASS: Leader
STAR WARS CLASS: Empire
POINT VALUE: 30
SPEED: 10
SPECIAL POWER: Force Push (Warrior)
SPECIAL POWER RATIO: 20/26 (77%)
ATTACK TYPE: Striker (Lightsaber)


Because of this figure's thick, black robes, I like to call him “Grim Vader” or “Darth Reaper,” as he reminds me a lot of the Grim Reaper. With his arms rotated above his head, he can make for a very scary striker, indeed.

Vader's special power can also be used to disrupt a formation that your opponent has carefully built...or draw one of your opponent's Warriors closer to one of your remaining strikers or shooters to make the kill that much easier.

Tip for attacking with Darth Vader:
Darth Vader is a spooky dude. His thick robes must slow him down, as he can only move 10 Tix in this incarnation. However, he's also got a wonderfully long saber, and it can be used to strike in two different ways. If you keep the point of his sleeve pointed straight down, you'll have a standard strike that can take out 4 well-packed 30- and 40-point figures. However, if you put the point of his sleeve straight up, he'll deliver a powerful overhand strike that can take out 5-6 packed 30- and 40-point figures! It can be a bit difficult to keep his hand up in this position, but if you do, the initial impact will send a single figure topping up onto its head, causing it to then bounce up between 6 and 12 inches off the playing field as it flies. If nothing else, this generates some interesting trick shot possibilities. To complete the ghoulish look (and to make it a bit easier to strike with him), point his left sleeve straight up, too.

Vader's special power can be used to disrupt an opponent's Warriors in a major way. You might want to push a threatening striker away so that your opponent's next attack attempt is thwarted. However, if your opponent is out of attacks for this turn, you may want to bring an opponent's figure closer to you (and/or out of formation) to make your next attack that much easier and deadly.

Tips for attacking Darth Vader:
The solidity of Darth Vader's robes help to keep him up in the face of launcher attacks. At 10 Tix, a small missile or Force blast to the upper chest or head will take him down. However, at 15 Tix, a Force blast can't knock him down, though it will knock him back a couple of Tix. Nevertheless, a well-aimed large missile to the chest can knock him over nicely. It'll take a half-power swing from a striker to knock him down, though a quarter-power swing will scoot him across the table around 10 Tix.

You'll likely want to attack Vader with the last attack of your turn. This will prevent any other attacks you might want to make on your turn from being thwarted. This can take some discipline, as Vader's considerable striking power can be awfully threatening. Because he's a slower striker, you might also be able to get the jump on him with a faster striker group (which might include his S1 alter ego, with 14 Tix of movement per turn).

Alternative Strategies
Let Vader hang back for a bit if your opponent advances toward you somewhat heedlessly. That way, you can surprise them with a Vader-sized chomp out of their forces when they get in range of his saber (the length of which s/he may not anticipate).

Or be bold and charge Vader into the thick of battle! Even if he falls, his special power can set your opponent's figures into a disarrayed mess, ripe for the picking off. And if he doesn't fall, your opponent will have to contend with an incredibly powerful strike that has some funky spin to it, if it's done properly.

Attacktix Battle Packs - Wal-Mart Exclusive

Awesome ATTACKTIX Battle Packs - Available exclusively at Wal-Mart!

Introducing ATTACKTIX Battle Packs, featuring exclusive figures and fierce Battle Masters! This awesome pack includes a Booster Pack with one common, one rare and one super rare figure; three exclusive gold series figures with new powers you won’t find anywhere else; and the massive Republic Gunship. A total of 6 figures and one Battle Master, all in one amazing Battle Pack! Available only at Wal-Mart this fall.

Tuesday, November 01, 2005

Series 2 General Grievous Starter Set

Grievous Starters are hitting Walmart shelves (and probably others) this week. Here are the stats for the four figures inside.

Clone Trooper (Yellow)
Trooper
Republic
#36-2
Speed 4
Cost 10
Attackback (Jedi)
4/26 (15%)

Super Battle Droid
Trooper
Droid Army
#37-2
Speed 4
Cost 30
Attackback (Warrior)
6/26 (23%)

Obi-Wan Kenobi
Warrior
Jedi
#38-2
Speed 12
Cost 30
Recover (Trooper)
18/26 (69%)

General Grievous
Warrior
Droid Army
#39-2
Speed 6
Cost 30
Rescue (if OPPONENT has Jedi Play)
10/26 (38%)


Attacktix Exclusive Gold Based Figures

Breaking news at Rebelscum.com

Star Wars Attacktix Battle Pack will probably be released for Christmas, with this new breaking weeks before Black Friday. No word on price yet, but the images suggest it will contain one Series 2 Booster Pack (three figures) and three re-released Series 1 figures with Metallic Gold bases. The Gold based figures will also have powers different than their black or chrome counterpart. Oh, and let's not forget the Gunship stuffed in there, too!

Figures in the images released from Hasbro feature: Nute Gunray, Plo Koon, and Ki-Adi Mundi. No word if these three figures will vary by set, but the molded plastic behind Plo Koon fits very tightly.


Thursday, October 27, 2005

Shaak Ti #20 Tips and Tricks

Shaak Ti #20
Guest Review: Phoenix

ATTACKTIX CLASS: Warrior
STAR WARS CLASS: Jedi
POINT VALUE: 40
SPEED: 4
SPECIAL POWER: Recruit (Ki-Adi-Mundi)
SPECIAL POWER RATIO: 8/26 (31%)
ATTACK TYPE: Shooter (Force Blast)

Like Plo Koon, Shaak Ti is an expensive force blast figure. With a high point value and low speed, she is a risky addition to a small team. Strikers and shooters are welcome teammates to enhance her effectiveness on the playing field. Thus, I recommend only using her in >150 point games unless you have precision aiming and are an expert with force blast kills.

Being that she is only one of three female characters in the entire game of Attacktix, Shaak Ti is an important part in introducing the game to women and young girls. Her figure design is one of the brightest and unique of all the figures in my opinion and your daughter/wife/girlfriend may be more willing to play with you if you show her how cool a girl Attacktix can be on the playing field. Being a woman myself, I think Shaak Ti is my favorite character and I hardly play without her.

Tip for attacking with Shaak Ti:
Like any Force Blaster, a guaranteed kill is within eight tix for someone with poor aim. Want to improve your aim? It‘s simple - just have the top of Shaak Ti’s shooting arm at a 90 degree angle with the her base (like an upside down L) and aim directly at a strikers chest or protruding gun or body part (for example, Tarrful’s striking arm). Viola! You should be able to get a great kill at even up to twelve tix effectively. Farther away you may not have the oomph to do it but you should at least push your enemy back a bit.

If you’re playing with obstacles Shaak Ti’s force blast, when aimed upright, can usually shoot above them. However, I find it’s pretty ineffective overall but worth a try for the first few moves of using something like the Attacktix Battle Case. Every once in awhile you may hit someone!

When Shaak Ti is not attacking, keep her shooting arm down as far as it will go in what I call her “defensive position.” This will help make her very bottom heavy and a very narrow target for projectiles. This is a good strategy if your enemy is in close shooting range. With her force blast in and arm extended she is a very easy target for any shooter. Keep in mind that if you have fired with Shaak Ti, you can NOT lower her arm.

I tend to use Shaak Ti for all my beginning longer range attacks and then have her huddle in the back while my strikers attack. This works because it leaves her one of the last figures to kill. Keep in mind you may be able to bring Ki-Al-Mundi from your back-ups if her special power is activated. I never put Ki-Al-Mundi and Shaak Ti on the same team because of this, and I always allot Ki for my back-ups. The beauty of Shaak Ti’s special power is that it is still activated even if everyone on your team is dead - you do not need another figure in play to bring Ki back! It’s a superb special power and one that makes her stand out in the group of force blasters.

Tips for attacking Shaak Ti:
With a striker: If Shaak Ti’s arm is in defensive position (pointed down) the most effective way to kill her is to strike her on the right side of her body - the side with the force blast arm. With a very strong strike you can bring her down from the front or the other side but it is not the surest method. If her arm is raised without a force blaster in, then striking her directly in front or in back is the best method. If your opponent is silly enough to leave her arm extended with the force blaster in, she is a very easy target and can be brought down with any kind of weak strike to any part of her body.

With a shooter: If you’re close up, aim directly in the center of her force blast or her extended hand and she will quickly fall back. Shaak Ti is pretty difficult to knock down by a standard shooter opponent if she is in the defensive position. If her force blaster is in and her arm is down, you cannot shoot her down by aiming at her mid-back like you can most figures. My suggestion is a close-range shot to the back of her head - I’ve found this to be the most likely chance of bringing her down with a shot. Any other part of her body and she will most likely spin around and get pushed back instead of being defeated.

Alternative Strategies
Try to have Shaak Ti the last figure on your table - this way if she dies you still have a possibility of winning the game by bringing Ki-Adi-Mundi from your back-ups. Protect her by having her stay out of the main battle, keeping her behind your strikers and shooters. This is easy to do with her low movement. Because her force blast is large she can still do great damage from afar - just remember to keep your figures out of her blaster range so you don’t accidentally shoot one of your own guys.

Keep in mind the most vulnerable position Shaak-Ti can be in is with her Force Blast in and arm extended in front of her. Not only is she is easy to shoot down, but any angle of strike will send her toppling to death.

Wednesday, October 26, 2005

Kit Fisto #27-2 Tips and Tricks

Kit Fisto #27-2
Reviewer: Stephen


ATTACKTIX CLASS: Warrior
STAR WARS CLASS: Jedi
POINT VALUE: 20
SPEED: 12
SPECIAL POWER: Battle Cry
SPECIAL POWER RATIO: 20/26 (77%)
ATTACK TYPE: Striker (Lightsaber)


I like to call this guy Kit “the” Fist-o' Death. His saber is as long as Series 1 Armored Vader's, which allows him to execute perhaps the most powerful strikes of any Series 2 figures for 20 points less than S1 Armored Vader.

Kit's special power also requires no special figures to be activated. Thus, he can insinuate himself into just about any other team with no problems, making his insanely powerful strike available for all to use!

Tip for attacking with Kit Fisto:
Kit Fisto is a real monster on the battlefield. He's a quick guy, and he can strike with his saber positioned in three ways: with his arm more or less straight out at chest level, with the tip of his saber's hilt in front of his right hip, or with the tip of his saber behind his right hip. I've found that the best power comes from having it in front of his hip, which has allowed me to wipe out a group of five 40 pointers and one 30 pointer somewhat loosely formed in a 2x3 column. With his saber in the other two positions, he'll only take out 4 of those 6 because his arm expends some of the kinetic energy rotating around (if it's at chest level) or in friction against his hip (if it's behind his hip).

The Fist-o' Death's special power will give the remainder of your team a free attack on its next turn. However, it won't do you any good if you don't have additional figures to take advantage of this power. Hence, you'll want to use Kit in the front lines and dare your opponent to take him out.

Tips for attacking Kit Fisto:
Kit's only a 20 point figure for a reason: he's easy to take down. At 15 Tix, a Force blast or large missile to the head or upper chest is usually necessary to take him out. However, at 10 Tix, a well-aimed small missile can do the trick when aimed at his upper chest or head, too. A one-quarter power tap from a striker to his hip will also knock him down quite easily.

If your opponent has advanced only Kit Fisto into the fray (and is still far away from you), you might want to take a chance and knock him down early so that the third attack will be relatively wasted. However, you might be able to spread your figures out far enough so that even Fist-o' Death's saber can't take down all of them before you wipe out all of the other figures on Kit's team. Then, when you knock him down, his special power will have no one to benefit on the next turn.

Alternative Strategies
Charge Kit Fisto into battle in the front of a fast striker group. Only separate him from the support of the bases of the main group when you're ready to have him strike and perhaps sacrifice him for a valuable additional attack.

Alternatively, if you're good with shooters, you might choose to have him charge ahead of the entire group all by himself. Even if he gets knocked down before reaching your opponent, you'll get another attack that could be used to shoot up the opponent's figures and formations before s/he can regret the mistake!

What's your Attacktix MASS?

What is MASS? It's the Manzo Attacktix Scaling System. Much like the complex QB Rating system, this is a detailed system that evaluates each figure not only on ATTACK, SPEED and DEFENSE (Base Size) but also on its support features. Each figure has an Attacktix Class and a Star Wars Class, and these are called upon by powers. So a figure like a common Battle Droid will be more valuable that Padme. Also, every Special Ability modification and condition is noted and taken into account.

The most important part of MASS is that YOU can customize the balance of the scale. You rate the Attack and Special Power Values, and the worksheet will update the MASS for you.


NamePoint Value MASS
1Battle Droid10 31
2Super Battle Droid20 37
3Wookiee Scout20 31
4Clone Trooper10 26
5Clone Trooper10 27
6Padme Amidala30 23
7Plo Koon40 29
8Bail Organa30 24
9Wookiee Commando30 29
10V-Wing Pilot20 29
11Count Dooku20 35
12Clone Lieutenant20 21
13Grievous Bodyguard10 38
14Neimoidian Guard20 35
15Commander Bly30 20
16Darth Vader
40 46
17Palpatine40 26
18Ki-Adi-Mundi20 37
19Mace Windu30 43
20Shaak Ti40 30
21Commander Gree30 23
22Chewbacca20 29
23Agen Kolar20 34
24Emperor20 24
25Nute Gunray30 26
26Anakin Skywalker40 38
27Obi-Wan Kenobi40 41
28General Grievous30 30
29Tarfful30 35
30Yoda30 42
31Obi-Wan Kenobi30 41
32Darth Vader30 37
33Wookiee Commando30 27
34Clone Commander30 21
35Clone Sergeant20
22
36Boga60 40
37AT-RT70 36

Series 2

1
Jedi Knight
10
32
2
Utapau Warrior
10
25
3
Clone Trooper
10
25
4
Scout Trooper
10
11
5
ARC Pilot
10
12
6
Grievous Bodyguard
10
39
7
Royal Guard
20
32
8
Clone Commander
30
23
9
Clone Captain
20
15
10
Neimoidian Captain
30
23
11
Wookiee Captain
30
25
12
Battle Droid Commander
20
27
13
Bossk
30
21
14
Princess Leia
30
24
15
Jango Fett
30
20
16
Mace Windu
40
16
17
Darth Vader
30
35
18
Obi-Wan Kenobi
20
39
19
Destroyer Droid
40
39
20
Medic Droid
20
19
21
R2-D2
10
21
22
Tion Medon
20
30
23
Chewbacca
30
32
24
General Grievous
20
42
25
Darth Sidious
30
38
26
Darth Maul
30
42
27
Kit Fisto
20
41
28
Han Solo
30
22
29
Luke Skywalker
20
35
30
Boba Fett
30
24
31
Republic Gunship
70
50
32
Wookiee Warrior
30
-
33
Mace Windu
30
-
34
Anakin Skywalker
30
-
35
Clone Commander
30
-

I find more value in powers that ADD a figure for you, or SUBTRACT a figure from your opponent, as a guaranteed removal or addition of a figure is better than the chance to kill! But you can determine what's more important to you.

This is Version 1.0. I need to update the Conditions required to activate Special Powers in Series 2 and then apply that to support units. This version is still an excellent reference for weighing your figures.

DOWNLOAD IT NOW!

Tuesday, October 25, 2005

Attacktix Series 2 (Mace) Starter Sets $5.25

That's right, only $5.25 on Hasbro Toy Shop.com for the Attacktix Series 2 Starter Set AFTER SHIPPING. It says Mace in the description, but it shows Obi-Wan in the image. Either way it is FREE, and just a little over five dollars after shipping.

Get your FREE Starter Set here!

SOLD OUT!

Attacktix Series 2 DVD Available for Download

If you have yet to find a new Series 2 Starter Set on shelves, fear not! Here is the next best thing. The Attacktix Series 2 DVD has the complete collection of figures from Series 1 and 2 including Megas, and now it is available for download.

Download the DVD here (30 Megs)

Note: Series 2 does NOT have spinning Flash images, they are just still images. The DVD is available in all Starter Sets, and most of the tutorials and application are available for FREE on the Hasbro website. However, this DVD and all that good stuff inside is the exclusive property of Hasbro.

Palpatine #17 Tips and Tricks

Palpatine #17
ATTACKTIX CLASS: Leader
STAR WARS CLASS: Separatist
POINT VALUE: 40
SPEED: 4
SPECIAL POWER: Recover (Sith)
SPECIAL POWER RATIO: 10/26 (38%)
ATTACK TYPE: Shooter (Force blast)


Palpatine is a very, very bad boy – and a very different shooter from everyone else in Series 1. His arms are inflexible (the better to aim with), his Force blast is round (the better to scoot into opponents), and his base is exceptionally solid (the better to send him to the front lines).

Even without his Force blast in hand, the unique cupped position of his hands can deflect attacks nicely. This is a guy you don't want to tussle with unless you're ready to put a lot of force, or a strategically placed shot, into him.

Tip for attacking with Palpatine:
In my opinion, Palpatine is the single best figure with whom you can learn Force blasting. He has his arms stretched out precisely in front of him, so that the only complications in aiming him involve angles of attack and gravity. However, the immobility of his arms may take away some of the flexibility in aiming that more advanced shooters may desire.

If Palpatine hits a figure at 5 Tix, it's all over for that figure. Even at 10 or 15 Tix, Palpatine can knock over a Force blaster figure with its Force blast out front as a shield. However, his shot will bounce on the ground after between 18-20 Tix, so hitting figures beyond that distance can be challenging if you don't tilt him up to gain additional altitude to counteract gravity.

As befits his character, even though he's a Separatist by class, his special power allows him to Recover if there's a piece of Sith on your team. Nevertheless, his special power isn't the most probable to be activated, so you may want to put some additional figures behind him to prevent him from being knocked down.

Tips for attacking Palpatine:
Unless you're within 5 Tix, don't bother attacking Palpatine from the front, even if he's shot his Force blast. Your shot will just scoot off his cupped hands, perhaps knocking him back or around just a bit. If you can get a shot at his sides at 10 Tix, you may be able to knock him down with a Force blast or large missile. A well-aimed shot to his back can take him down, even at 15 Tix. Much further out than that, though, and you're taking an awful risk by shooting at him. Oh, and shooters with small missiles? Leave those for other figures; they won't stand much chance of felling Palpatine.

Strikers can bring Palpatine down, but not without a fight. His large base will allow him to withstand glancing blows; you'll need at least a one-third power hit to the back, a half-power hit to the sides, or a three-quarter power hit to the front to bring him down. Beware: If you bring Palpatine onto his right side, he'll have a nasty little surprise attack for you. It'll make him discharge his Force blast directly in front of him almost all the time, so make sure your forces aren't arrayed near where he falls.

If you can take out the Sith that are on Palpatine's team, he won't be able to pop back up again when you knock him down. Snipe those pieces of Sith with no mercy!

Alternative Strategies
Palpatine's sturdy base makes him a fabulous choice for a front-line attacker. If you can support his already considerable mass with some troopers or other figures in the rear, he'll be a beast to take down, and he'll deploy some rather convincing firepower against your opponent.

If you can team him with Count Dooku (who will also be allowed to Recover occasionally when another Sith is in play) and another Sith, you'll stand a good chance of at least two of them remaining in play for a while, on account of the synergy of their special powers. This concentration of the dark side will surely flummox any Jedi team's ability to predict what will happen in its future.