The All Wookiee Team has proven to be a very tough squad. The suggested 100 point game allows you to use all of the current Wookiee Class figures; Tarfful, Chewbacca, Commando and Scout. The squad is cooperative and fast, but fragile. The overall abilities of each figure working with the other will show you the whole is greater than the sum of its parts.
Chewie and Tarfful can make it to the other squad very quickly, and if they can survive the first round of enemy fire, they can be sure to take down two enemies on your second turn. The Wookiees tend to have smaller bases, so you need skilled shots and speed to destroy your enemies.
Have your shooters cover Chewie and Tarfful as the charge into battle. Be sure to keep their Striking arms down, so they don't have easy targets for your opponents.
If you get the honor of going first, and would rather your opponent come to you, try the following. Keep Chewie on the right and Tarfful on the left. Despite what I stated above, keep their Striking arms out, and place the Shooters in front of their mighty paws. Chewie and Tarfful can take some missiles from this range on their body, and the Shooters will protect their paws. Also, if the Shooters are then targeted, there is a good chance the Wookiees hands will support the units, and hold them up for another round.
Even though the Shooters are protecting the Strikers, they are still providing cover enabling the Wookiees to move up field (slow as it may be). After two rounds, and about 12 Tix into battle, you should break your Wookiees loose for some Striking and pull your Shooters back for ranged attacks.
If your Shooters should fall (now or earlier) it's not a bad idea to move your two Strikers together and march forward, hands down, single file. This should keep you as secure as you can be for someone in the center of the battle field.
Saturday, April 30, 2005
Friday, April 29, 2005

Wookiee Commando #9 & #33 Tips and Tricks
Wookiee Commando #9 & #33
ATTACKTIX CLASS: Warrior
STAR WARS CLASS: #9 Wookiee / #33 Republic
POINT VALUE: 20
SPEED: 6
SPECIAL POWER: #9 Rally (Wookiee) / #33 Attackback (Leader)
SPECIAL POWER RATIO: #9 8/26 (31%) / #33 18/26 (69%)
ATTACK TYPE: Shooter (Blasts)
The Wookiee Commando, is my favorite support unit for the Wookiee Teams. The larger type Blasts will pack more punch than the Wookiee Scouts. The Commando's arched back will help keep him balanced, and allow him to get moved around a bit from long ranged attacks, but he can still be taken down with some ease. They have a larger base, are actually pretty light for their size, so they can take a bit of a beating.
The Wookiee Class Commando can be picked up in the booster sets, and is a valuable asset to the Wookiee Team. About one third of the time we will allow one of your defeated Wookiees to come back into play. Also, the fact that he is a true Wookiee, he can help keep Tarfful in play, and also get a free attack with Chewie (should their Special Powers activate).
The Republic Class Commando is only found in the Starter Set. He works well with the Wookiee Team, even though he is not truely a Wookiee. He can still give Tarfful a free attack, should he fall, and can attack as a Wookiee decoy. I do not endorse cheating, but if YOU forget he is not a Wookiee and your opponent does too, he may take advantage of your Wookiee powers, as well.
In the same sense, your opponent will probably not check your figures out that closely, so he will probably just fire at who ever is the easier target. If you have a strategy for one Commando, use that to your advantage.
Tip for attacking with Wookiee Commando:
The Commando's large missile can do a lot of damage. Use the basic skills of the Shooters, aiming for any extended parts of the figure (arms, guns, etc) to try to knock them off balance. Using your projectile Wookiees in groups will help them reinforce one another. Send your Strikers in, providing a shield from your opponent's Shooters. Be sure to allow enough room, and line of sight, for your Shooters to take out your opponents.
Tips for attacking Wookiee Commando:
The Wookiee Commando has good balance, but can still be taken down from any distance. Take a look at the team and try to eliminate the Wookiee support first. A shot on Tarfful could go wasted if he gets to Stand Up again. Killing Chewie could also give your opponent a free turn if he has two other Wookiees in play. Eliminating the Wookiee Commando first will prevent his Special Power form having any effect, since no Wookies will have been defeated. Then take out the Scouts, who give free attacks to their Warriors. Finally, take out the Strikers!
Alternative Strategies
Attacktix Wookiee Weekend is almost over, the Wookiee Team Strategy is coming next.
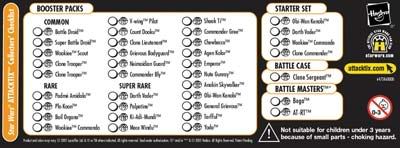
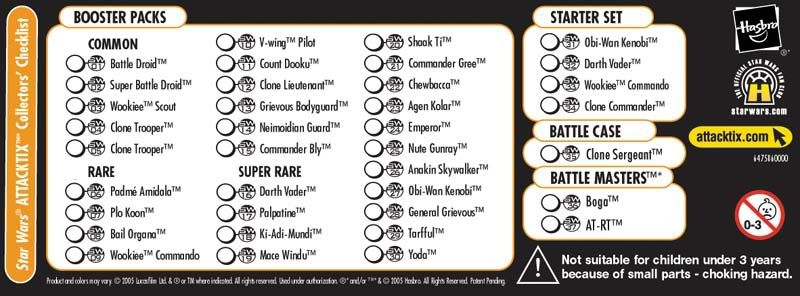
Attacktix Official Rarity Checklist Released
Thanks to JayPee for seeing this update on Hasbro.com.
Hasbro broke the checklist down by Common, Rare and Super Rare. (Rare and Super Rare, kind of like Grande and Venti Rare?)
Click on the image below to bring up the full-sized image. Be sure to set your printer to "Landscape" before printing!
Hasbro broke the checklist down by Common, Rare and Super Rare. (Rare and Super Rare, kind of like Grande and Venti Rare?)
Click on the image below to bring up the full-sized image. Be sure to set your printer to "Landscape" before printing!
Thursday, April 28, 2005
Attacktix Forum Grand Opening!
Be sure to check out the new Attacktix Forum. Look for the link below, that appears on every page of this site. Anytime you want to see what other are talking about, click on it and have fun!

Wednesday, April 27, 2005
Attacktix Celebration Secrets and Gossip
Information overheard at Celebration 3.
Special thanks to Dex1138 at TheForce.net for the C3 Gossip
An Attacktix/Hasbro rep. was asked what is special about the Attacktix Chrome Bases.
The rep. replied that though there is nothing made known yet, "They will have a special significance soon and to hold onto them." She would elaborate no further.
The display cases at C3 also contained Attacktix figures that were all silver. Not just chrome based, but painted entirely silver. These were tournament prizes for the first ever Attacktix Tournament held at C3. Check out the Tournament Prize Versions below. The coolest part being their all black projectiles.
Chewbacca Clone Trooper General Grievous Shaak Ti Yoda
None of the above have been spotted on eBay yet!
Some quick secrets and gossip.
Chrome bases are a variant. 1:3 boosters should get you one.
Carry case is due out first week in May. Holds 12-18 figs depending on their size.
Next wave due out in Aug/Sep. Each wave will introduce new rules/abilities. There will be new rules for bounty hunters.
R2-D2 has no attack, but instead has a spinner (numbered 1-5) built in. You can spin to see how many units can fire on your turn, but he can backfire, leaving you with only 1 attack!
Medical Droid will also be without an offense, and have the numbered dial (1-5). Once it counts down, you can bring back a defeated unit. Possibly counts down one per turn.
The Republic Gunship will be able to pickup units and fly them into combat! The unit can then disembark and move using its own movement.
A Grievous Striker figure could be seen in a later series. Six lightsabers?
An unnamed Attacktix creator advised C3 Conventioneers to shoot for the base and not to be afraid to take the headshot. But, maybe they are lying to gain an unfair advantage. They could be "Tricksie"!
Tuesday, April 26, 2005
Monday, April 25, 2005
Attacktix Figure Checklist
The Attacktix Series 2 list was released at Celebration in Indiana this weekend, so I figured this is a good time to post the complete checklist, along with the upcoming figures. Figures reviewed on this site will linked to their review.
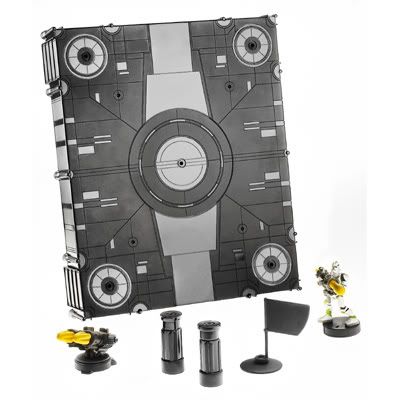
Plus, new pics of the Battle Case HERE.
SERIES 1
#01 Battle Droid
#02 Super Battle Droid
#03 Wookiee Scout
#04 Clone Trooper
#05 Clone Trooper (B)
#06 Padmé Amidala
#07 Plo Koon
#08 Bail Organa
#09 Wookiee Commando
#10 V-Wing Pilot
#11 Count Dooku
#12 Clone Lieutenant
#13 Grievous Bodyguard
#14 Neimodian Guard
#15 Commander Bly
#16 Darth Vader
#17 Palpatine
#18 Ki-Adi-Mundi
#19 Mace Windu
#20 Shaak Ti
#21 Commander Gree
#22 Chewbacca
#23 Agen Kolar
#24 Emperor w/ Possession Power
#25 Nute Gunray
#26 Anakin Skywalker - Blaster
#27 Obi Wan Kenobi - Projectile
#28 General Grievous - Projectile
#29 Tarfull
#30 Yoda
STARTER SET
#31 Obi Wan Kenobi-Lightsaber
#32 Darth Vader -Ligthsaber
#33 Wookiee Commando
#34 Clone Commander
BATTLE CASE
#35 Exclusive Trooper
DELUXE FIGURES
#36 Boga
#37 AT-RT
SERIES 2 September Release (All pictures from Sir Steve's Guide)
Basic Jedi Knight SEE PICTURE
Uat Pau Warrior
Clone Trooper
Scout Trooper SEE PICTURE
ARC Pilot SEE PICTURE
Grievous Bodyguard
Royal Guard
Clone Commander
Clone Captain
Neimoidian Captain SEE PICTURE
Wookie Captain
Battle Droid Commander
Bossk SEE PICTURE
Princess Leia SEE PICTURE
Jango Fett
Mace Windu
Darth Vader
Obi Wan Kenobi
Desroyer Droid
Medic Droid
R2 D2 SEE PICTURE
Tion Medon
Chewbacca SEE PICTURE
General Grievous
Darth Sidious SEE PICTURE
Darth Maul SEE PICTURE
Kit Fisto
Han Solo SEE PICTURE
Luke Skywalker
Boba Fett
DELUXE FIGURES
Republic Gunship
Sunday, April 24, 2005
Attacktix Classes - Attacktix Class Breakdown
Attacktix Classes - Every figure has an Attacktix Class. Attacktix Classes are used with all Star Wars Attacktix Battle Figures and can be used with figures from other Attacktic Sets
 Troopers are standard soldiers. Usually low cost. Their special powers make them great auxillary figures, helping other members of their Star Wars Class or their superiors.
 Warriors are independent fighters. Again, a lower costed figure, working well in large groups.
 Captains are mid-level commanders, usually in charge of groups of Troopers. Slightly higher point value than their troopers, but with better armor and weapons.
 Specialists are individuals with specialized skills. Higher end weaponry and and armor with point value to match.
 Leaders are high-level commanders in charge of large groups. Highest point values, but with great armor and weapons.
 Megas are oversized Battle Masters with extremely powerful attack skills. Two Megas exists, with more promised in Series 2. Fantastic defensive units, with equally impressive weapons.
Troopers are standard soldiers. Usually low cost. Their special powers make them great auxillary figures, helping other members of their Star Wars Class or their superiors. Warriors are independent fighters. Again, a lower costed figure, working well in large groups. Captains are mid-level commanders, usually in charge of groups of Troopers. Slightly higher point value than their troopers, but with better armor and weapons. Specialists are individuals with specialized skills. Higher end weaponry and and armor with point value to match. Leaders are high-level commanders in charge of large groups. Highest point values, but with great armor and weapons. Megas are oversized Battle Masters with extremely powerful attack skills. Two Megas exists, with more promised in Series 2. Fantastic defensive units, with equally impressive weapons.
Attacktix Classes - Star Wars Class Breakdown
Attacktix Classes - Every figure has a Star Wars Class. Star Wars Classes are used with all Star Wars Attacktix Battle Figures.
 The Republic is the Galactic Government in danger of collapse during the time of Epsiode III.
 The Separatists are the revolutionaries seeking to secede from the Republic.
 An ancient order of Force-users, the Jedi believe in the Light side of the Force.
 The Sith are an ancient order of evil Force-users, who use the Dark side of the Force.
 The Droid Army serves the Separatist forces as their limitless mechanical army.
 The Wookiees are the fierce, furry warriors of the planet Kashyyyk.
Bounty Hunter Class coming in Series 2!
The Republic is the Galactic Government in danger of collapse during the time of Epsiode III. The Separatists are the revolutionaries seeking to secede from the Republic. An ancient order of Force-users, the Jedi believe in the Light side of the Force. The Sith are an ancient order of evil Force-users, who use the Dark side of the Force. The Droid Army serves the Separatist forces as their limitless mechanical army. The Wookiees are the fierce, furry warriors of the planet Kashyyyk.Bounty Hunter Class coming in Series 2!
Friday, April 22, 2005
Attacktix Wookiee Week - April 24th - April 30th
Attacktix Wookiee Week begins on Sunday April 24th. The Wookiee Team has been my favorite Attacktix team, by far, so I plan to review each one this upcoming week.
Be on the look out for Tarfful, Chewbacca, Wookiee Commando, and Wookiee Scouts (both versions). Tips and Tricks should be full of hairy info on how the team works together and how to take it apart (which is NOT easy).
Also, be sure to check out the sneak peek at Series 2 Attacktix! I grabbed this from Rebel Scum and brightened it up a bit.

It looks like Boba Fett, Bossk, Darth Maul and Luke. I am not sure about the bottom guys. The text reads:
Booster Packs 30 Randomly Packed figures in Series 2
New classic characters
Bounty Hunters
More troopers
Also, here are some clear images of Boba and Darth from the offical Hasbro site.

Check back here for more Attacktix News, Tips, Tricks and Reviews. And of course, starting off Wookiee Week, the Attacktix Battle Case Countdown begins.
Be on the look out for Tarfful, Chewbacca, Wookiee Commando, and Wookiee Scouts (both versions). Tips and Tricks should be full of hairy info on how the team works together and how to take it apart (which is NOT easy).
Also, be sure to check out the sneak peek at Series 2 Attacktix! I grabbed this from Rebel Scum and brightened it up a bit.
It looks like Boba Fett, Bossk, Darth Maul and Luke. I am not sure about the bottom guys. The text reads:
Booster Packs 30 Randomly Packed figures in Series 2
New classic characters
Bounty Hunters
More troopers
Also, here are some clear images of Boba and Darth from the offical Hasbro site.
Check back here for more Attacktix News, Tips, Tricks and Reviews. And of course, starting off Wookiee Week, the Attacktix Battle Case Countdown begins.
Wednesday, April 20, 2005
Attacktix Interview - Jeff Grubb
Jeff Grubb is a Civil Engineer, Game Designer and Author. You can read more about Jeff at his own blog, Grubb Street. He is also a member of the Alliterates. The Alliterates is a fellowship of writers, modeled after the Inklings, the social club of Tolkien, Lewis, and other Oxford dons. The group consists of fantasy writers, and other game designers, who secretly control the world from basements and bars across the US.
Q: You are designing an Alliterate card for a new expansion edition of Magic. What does the description read?
A: Alliterate Quorum (Artifact) 4
Tap, 2; Search you library for an Alliterate and put it into play,
tapped. You may only do this if there are fewer than five Alliterates
currently in play.
When of your Alliterates is tapped, all of your Alliterates are tapped.
"Everyone should believe in something. I believe I'll have another
beer." - Big Book of Alliterate Wisdom.
Q: Would it be fair to say the same handful of guys have designed, pretty much, all the mainstream Collectible Card Games and Miniature Games out there (and ones we don't know about)?
A: I think there are a number of "usual suspects", but, like RPGs, there are a lot of newcomers to the field as well. Often these are guys with experience in related game design who break into the new field. Three years ago I would hardly consider myself a Miniatures Game Designer, despite some work in the ancient BattleSystem from TSR, but since then I've done HeroClix, Star Wars Miniatures and now Attacktix.
Q: Which character, figure, team, etc., did you have the most fun designing (spanning all your credits, Hasbro, WotC, WizKids)?
A: Big figure? Galactus from HeroClix. No doubt about it.
Regular-sized figure - C3PO from the Star Wars miniature game. We gave
him a mechanic that made him function like his role in the movies, made
players want to use him, and infuriated the opposition (his power was
that, if you COULD shoot at C3PO, you had to save or attack him INSTEAD
of your normal target. And he had a high defense, so you wouldn't
usually hit him.)
Q: I used to play Spellfire, and I know a few of those Vampires were actually creators names backwards and sideways. Is there any game I can find a Grubb, or Bbrug, character?
A: Hmm, I think there was a "Mother Grubb" in the old Bloodstone Pass
modules, and a Hardy Boys book where there was a game designer named Jeff
King (named after me and fellow Allit Rob King). And my smiling (well,
screaming) face showed up on the cover of Temple, Tower, and Tomb, (art
by Paul Jacquays). Oh, and I invented the Internet in the original
Cyberpunk game. But I don't have any Fejburgs floating around.
Q: Since this site is about Attacktix, do you have any tips? Any 10, 20 point steals? Loopholes?
A: Attacktix? Nay, its perfectly balanced! Oh, all right - Mace Windu is undercosted - he was a favorite in playtest.
Q: How does someone become a Game Designer? Any resources you recommend if you want to start your own game?
A: My advice to any would-be Game Designer is "Flee! Flee while you can!" My own background is Civil Engineering, and I find that a lot of my training in that area ( schedules, deadlines, math skills) is very useful in the various types of game design. The other reccommendation is design what you like to play - if you're enjoying it, there is a good chance others will as well.
Q: So you snuck a Jeff Grubb figure into the Attacktix Universe. What's your team/class and more importantly if your base is white what's your special power?
A:
Star Wars Class: Jedi
Attacktix Class: Specialist
Special Power: Innovate: If White, put another mechanic from a
completely different game into play. Then stand back and watch the fireworks.
-Jeff G.
Saturday, April 16, 2005
AT-RT #37 Revisited - Improving the Figure
AT-RT #37
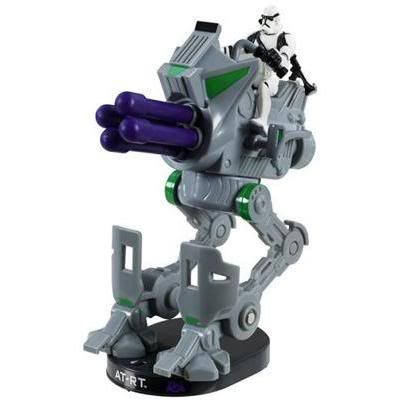
ATTACKTIX CLASS: Mega
STAR WARS CLASS: None
POINT VALUE: 70
SPEED: 4
SPECIAL POWER: Recruit (Trooper)
SPECIAL POWER RATIO: 4/26 (15%)
ATTACK TYPE: Shooter (Blasts)
UPDATE:
Email to Hasbro Customer Service:
Q: "When the AT-RT attacks, can it change where it is aiming after each of its four shots? Or, does it have to shoot all of its missiles towards the one direction it has pointed its weapon?"
A: "Thank you for contacting Hasbro, Inc.
Once you begin firing, your figure cannot be moved.
We appreciate having the opportunity to assist you."
This is a great figure. Great intentions, but we know you hate it when you fire a direct hit from across the table and the Target Spot bounces back into place. I wish I could take credit for this, but I can not. Graham Smallwood from Board Game Geek suggests using a rubber band to make this figure react like it was intended to.
I purchased some clear rubber bands, the kind found in the hair product section of Target. I only used these so it would not detract from the figure, but normal rubber bands are fine.
I took one and double wrapped it around the lip that sticks out of the back of the knee. Then I pulled the rubber band under the base. Finally, for my figure, I pulled the rubber band up between the two big side toes, and then stuck it under the circle that the legs pivot on.
Repeat this process on the other leg. The specifics placement of the rubber bands is not crucial to game play, just to the look of the figure.
Now take a shot at the AT-RT from across the table and enjoy the fact that if the Target goes down, it STAYS down. Even more enjoyable is watching the AT-RT topple over on top of one of its allies.
Thursday, April 14, 2005
Gameplay Variations - Checkpoints
If you can't wait for the Battlecase Playset and the Capture the Flag variation, you may want to try these Variations. These may be included in the CTF rules, but in the meantime you can do it yourself.
CHECKPOINTS
In Checkpoints, the object is to control three points on the battle field. One is in the dead center of the field, the other two are about one foot from the edge of your starting point. Use electrical tape, or some type of non-permanent tape to mark an "X" in the center of your table. Then make two similar "X"s on each team's starting side, about one foot from the edge. Use a measuring device so that the distance is fair.
Gameplay is the same as King of the Hill, move all your figures and attack with only two. The object is to control all THREE Checkpoints. Only the unit standing on the "X" is in control. You must have one player on each of the Checkpoints to win. If you accidentally knock an opponent onto a Checkpoint, they DO keep control of the Checkpoint.
Anytime you kill an opponent who controls a Checkpoint, you get to Revive one of your defeated figures. If you do not have any figures who were defeated you do not get any bonus, nor can you recall this bonus later. This is like the "Dodgeball Rule", or Rally, but for the killer not the victim. Your revived figure starts two Tix away from the edge of your side of the table.
The main difference between Checkpoints and King of the Hill is that there is no need to keep score in Checkpoints. The first team to control all three Checkpoints wins. You do not need to complete your turn after the movement phase of your turn.
Strategies
Getting killed while controlling a Checkpoint can really turn the tide. The possibility of keeping your figure a Tix or two away from the Checkpoint until you are ready to control it can eliminate a two person swing.
Gameplay Variations - King of the Hill
If you can't wait for the Battlecase Playset and the Capture the Flag variation, you may want to try these Variations. These may be included in the CTF rules, but in the meantime you can do it yourself.
KING OF THE HILL
In King of the Hill, the object is to control a neutral point in the center of the battle field. In the image above, there is a large circle, big enough for a Boga or an AT-RT to fit inside. Use electrical tape, or some type of non-permanent tape to mark a circle in the middle of your table. Medical tape will work too, you don't want to ruin your table with sticky adhesive. If you have a glass table, you can get special markers that will erase with a cloth, but be SURE they are made for this purpose.
Gameplay is the same, move all your figures and attack with only two. The object is to get inside the circle and control it. Only one team may "control" the circle at once, so if both teams have a figure inside, no one is in control.
Points are awarded once you control the circle for a full turn. One full turn means only your team's figures occupy the circle at the end of your two attacks. Then, when your next turn begins, if at least one of your figures remains in the circle, and no opponents are there you get one point.
Keep a tally of points using pennies. Gameplay continues until "Last Man Standing". The last man standing is awarded ONE extra point if his is outside the circle, and TWO extra points if he is inside the circle.
Strategies
Strikers typically have a higher speed, which means they can run to the center quicker. But a well balanced team of Strikers and Shooters can keep you in control of the center!
Boga #36 Tips and Tricks
Boga #36
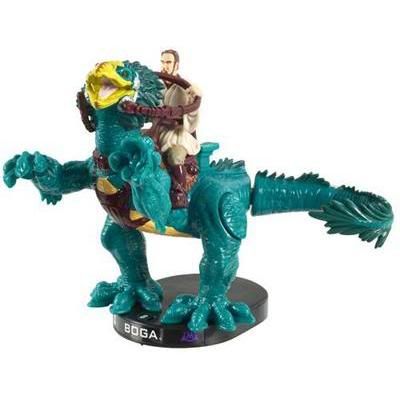
ATTACKTIX CLASS: Mega
STAR WARS CLASS: None
POINT VALUE: 60
SPEED: 8
SPECIAL POWER: Recruit (Obi Wan)
SPECIAL POWER RATIO: 6/26 (23%)
ATTACK TYPE: Striker (Tail)
The Boga is a worthy adversary to the AT-RT. This Mega Striker can take down entire groups of opponents. He is pretty quick too, for a large figure. 8 Tix per turn can get you in range pretty quickly. He is easier than the AT-RT, when it comes to taking him down, but only because a direct him will ALWAYS "push his buttons". The AT-RT, as you know, can take some direct hits and not even flinch.
His two "Target Spots" are on his sides, which make him tough to hit early on. That suits him, because he can not make an attack until the third turn, or so (depending on your table size). This is a nice advantage for many reasons. He can block your lower value figures until they are in range to do damage, before they die (the Shield Defense). Also, keeping a flanker on each side, protecting his Sweet Spots will prevent any premature deaths.
HOUSE RULES this is a monster figure, since we allow all figures to spin 360 degrees without taking a Tix, we give the same option to this beast. This also means temporarily moving opponents out of the way, then placing them back once he is in his desired position. As long as all the figures remain in their original spot, this is legal. You can not, for instance, place his tail between a figure's legs. It is just a means to move "through" opponents' figures.
Tip for attacking with Boga:
The Boga is a straight forward Striker, with nice defense. Difficult to be knocked over without the use of the Target Spots, but I am assuming it can be done. There is not much need for direction when it comes to killing 10-40 point figures, get your tail anywhere close to them and knock them down. Look for groups of two or more, and there is a good chance you can get multiple kills!
But you want to take down the AT-RT. No problem, Boga can do this, as well. One-on-one the Boga should win every time. You should only be exposing your right side to the AT-RT, so he can never get to your left side. Take your time and knock over each target, one by one, if there are no other enemies to worry about.
If you need to take him out with one blow, here is the best way. If you play with either the "No Reloads" HOUSE RULE, or the "Fire All Missiles" on the AT-RT, then there is a good chance you will come up against the AT-RT when he has NO missiles in his rack. This makes him more likely to fall backwards. Now, if your opponent leaves his AT-RT's head tilted backwards, you will have no problem taking the whole unit down with one swing.
I like to move my Boga so he is perpendicular to the AT-RT. The (rounded) corners should not be touching, but instead it should be "touching" the outter tips of the AT-RT's "toes". Then, I keep that corner in place and twist the tail a touch closer to the Targets. If the AT-RT's head is level, or slightly back you should be able to knock it over. If it is loaded with missiles, and leaning forward this will be a much more difficult task.
Tips for attacking Boga:
The Boga is one of those figures that will make you run to it, in order to attack it. If he stays straight ahead, hitting the sides of him will be difficult. Have a well balanced team of Shooters and Strikers so you can try to take him out from all levels. The Boga's buttons are a lot easier to make contact with AND cause a hit, so take your chances when you have them.
Spread out when the Boga is near. No need to lose two or three guys at once because you are preparing for projectile fire. If the Boga can reach you, he will knock you all down.
If you are playing the AT-RT against the Boga, have your Troops attack the Boga's left side first. If you and the Boga go head-to-head, you will never get a chance to hit him on the left side. Get his left side early, so you can make short work of his right when he comes to you!
Additional notes
Try moving the Boga along the side of the table, making it hard for someone to hit the Target on outside. Keep him close enough to the edge so that no one can move in the gap, but also far away to prevent any freak knock downs. This may work well until someone figures out a way to knock him off.
Wookiees seem to make great allies with the Boga. They are very difficult to hit with ranged weapons, especially if you keep their big hands at their sides. Move some Wookiees up field, protecting the Boga's Targets and you can be sure your Boga will do some damage.
Get used to the Boga's tail. The last segment has the most whipping action, but the middle segment has the most strength. Keep this is mind when approaching your foes!
Tuesday, April 12, 2005
AT-RT #37 Tips and Tricks
AT-RT #37
ATTACKTIX CLASS: Mega
STAR WARS CLASS: None
POINT VALUE: 70
SPEED: 4
SPECIAL POWER: Recruit (Trooper)
SPECIAL POWER RATIO: 4/26 (15%)
ATTACK TYPE: Shooter (Blasts)
AT-RT (All Terrain - Recon Transport) is the first Mega Class figure I was able to test. This is a tough figure to take down. He has two "Target Spots" just above his feet. You'll need to attack them one at a time and once the second one falls down, the AT-RT should topple. Remember as long as any part of the base leaves the table, it is down.
That being said, it is still hard to get these targets to click back. At close range, mid range and long range the Blast just didn't cut it. They would bounce off, or ricochet, and even if it knocked it back it would lock back in place. If you do knock one down, sometimes a second shot will lock it back in place. Our HOUSE RULE if that happens is to set it back to the hit position. While we are on the subject of HOUSE RULES, we also play ONE shot per turn. We do not shoot all FOUR. We do, however, allow TWO shots in one turn from the AT-RT but then there is no second attack from a different figure. This can make it more exciting if he is the last one left, but we do not allow it to retarget. In other words, you can shoot a second time, but you can't aim in a new direction.
HOUSE RULES are friendly rules we have agreed on in our gaming circle, but they may not fly in yours.
Tip for attacking with AT-RT:
The AT-RT is basically a giant Clone Trooper as far as attacks go. The small Blasts work great from all distances, but keep in mind that the AT-RT is shooting from a much higher height. This extra height can change some "sweet spots" on familiar targets. Wookiees, for one, which I find wonderfully balanced, can take AT-RT Blasts from all distances and stay on their feet. If the Wookiees are giving you trouble, aim for the Striker Hand and you can get a knock down.
Little critters like Yoda get get right up to your base and be very difficult to hit. So before you take your first shot, make sure you don't need to move your figure back a Tix or two.
Tips for attacking AT-RT:
I can't say I have many sure-fire ways to knock the AT-RT over, but you will definitely need to sharpen your shooting skills. The "Target Spot" is pretty large, but the real spot to aim for is the upper frame of the target. Anything lower and you run the risk of a direct hit that doesn't knock it back.
Lightsaber Strikes can hit the spot, just make sure you line up the lightsaber with the upper part of the Target Spot. Most effective are the Force Blasts and the Wookiee Hand Strikes. Chewbacca is pretty inexpensive and can smack the Targets over, no problem, if he can survive. His massive hand that cause all the damage, also is his biggest target.
Force Blasts from close to medium range can do damage as well. At close range I recommend, again, aiming high on the Target and hope for the best. The Purple Blasts, when loaded, will block the large size of the Force Blast, which is why I recommend the following HOUSE RULE. The AT-RT does NOT reload at the beginning of each turn. We only allow reloads after all FOUR shots have been fired. This allows for a more vulnerable target, so you have to time your attack before it is reloaded.
One attack strategies
So do you want to impress/enrage your friends and take the AT-RT down with one attack? Here are some tips to PRACTICE, before you try these in battle.
WOOKIEE DEVASTATION. Load up with Wookiees, you want Tarfful to make it face-to-face with the Recon Transport. You also want Chewbacca if Tarfful falls. Tarfful needs to approach the AT-RT at the front of the AT-RT's left leg. Pull Tarfful up along AT-RT's left leg and aim his mighty hooked paw for the inside lip of the Target Spot. A good swing can catch Tarfful's claws on the lips of the Target and bring him spinning down. I can get this to work about 1/3rd of the time. So it's great to keep in mind if it's one-on-one!
Chewbacca needs to get behind the AT-RT and attack the inverted right knee of the AT-RT. Bring his huge hand to strike the inner circle of his right knee and he too can bring him down with one swipe. Tarfful can also be successful with the left knee. Chewie is not a 1 in 3 chance, but if he is all you have left, you can get lucky.
INTO the BELLY of the BEAST. This one works well with any of the Force Blasts Jedi. If your opponent leaves his AT-RT's head elevated enough for you to aim your extended arm underneath the missile rack, then fire UP and AWAY! Basically, if the Force Blast is cupping the missiles, it's a sure thing! If you play with the rule of firing ALL the missiles, then this strategy will NOT work (and you would probably be dead from this range). But as long as there is ONE missile in the rack, you can succeed. Keep it simple, raise your arm, touch the missiles, FIRE!
JEDI and WOOKIEE COMBO. If you are trying the Belly of the Beast move and all the missiles have been fired, you will need a backup plan! This worked well with Tarfful and Plo Koon, but I am guessing it will work with any Force Blast figure. Move Plo Koon directly in front of the AT-RT. Put the Force Blast in his hands with the tip side up. Now raise the arm higher so that the flat-sided bottom is touching BOTH Target Spots. The two tips should just be touching both Target Spots and make sure it is on the TOP of the targets. Make sure Plo Koon's Blast is literally TOUCHING both targets and leave him there.
Now move Tarfful in behind Plo Koon and whack your ally in the back. Chances are very high you will kick your own character, however, I am able to bring down the AT-RT about 80% of the time. It takes a bit of practice to make sure the Blast is lined up right, and that Tarfful hits him square in the back. It works, and it's an awesome way to bring him down.
Additional notes
I was very excited to get this figure, but then I was quickly disappointed once I discovered how defensive he is. I even took an Exacto knife to the AT-RT Driver's butt and separated him from his seat in an attempt to add a new strategy to the game. But even with him only hanging on by the handle bars, he is very hard to hit, and NEVER falls off. Don't waste your time slicing him out. If I can figure out any variations to play this figure I will let you know.
Sunday, April 10, 2005
Official Attacktix Tournament Rules
Attacktix Tournament Master Rules
The Star Wars Attacktix Master Rules are rules for use primarily in tournament play.
Object of the Game -
Knock down all your opponent's figures. When you are the last one standing, you win!
Setting Up (Set Up Phase) -
Each player builds a squad by taking Attacktix battle figures of equal total cost. The standard tournament game uses 100 points of figures.
For example, you take Anakin (Cost: 40), Shaak-Ti (40) and two Clone Troopers (10 each) for 100 points, and the other player takes Palpatine (40), General Grievous (30), and Commander Bly (30) for 100 points. The rest of your figures are your back-ups.
Note: While 100 is the recommended point value for a squad, you can run a tournament with any point value as long as all players have equal points.
Special all silver figures (figures given as prizes at Hasbro sanctioned official Attacktix tournaments) - Only one all silver tournament figure may be played as part of your squad during the tournament.
Proxies: A proxy figure (i.e. substitue from a friend) figures are not allowed during Attacktix tournament play. You must own any figure you intend to play.
Play on the floor or a table, with a surface that allows the figures to move easily. Recommended play area size is 30 by 30 inches. Players start opposite each other.
Before placing a battle figure in the play area, roll it forward a few "tix." This is called "grinding" and scrambles the Attacktix window on the bottom of the base. After grinding, start figures 2 "tix" in from the edge of the play area.
Determine who goes first by grinding a battle figure while covering the window on the top of its base. One player grinds, the other calls "red" or "black." Uncover the window on the base. The player that makes the correct guess gets to take the first turn.
Backups: You are allowed up to 50 points in your back-ups.
Battle Masters: No "Battle Masters" figures are allowed during official tournament play.
Your Turn -
When it's your turn, move as many of your battle figures as you want. You can then attack with up to two of your figures.
Moving Your Figures (Movement Phase) -
Your figure has a Speed number on the top of its base. You can move your figure up to that many tix forward or back. You can turn as you move, or turn without moving. You cannot move sideways (moving so the figure does not make the tixing noise). Count the tix, and when you hear the last one, you stop moving.
You cannot knock over or push other figures while moving.
Attacking (Attack Phase) -
In Star Wars Attacktix, there are three types of attacks.
* Launcher - Load and fire your battle figure's weapon. You load by inserting the missile into the launcher, pushing it until you hear it lock in place. Pressing the trigger releases the launcher. You can move the battle figure's arms and tilt it to fire. If your figure has multiple launchers, all of them may be used in an attack.
* Striker - Twist and release your figure to hit a battle figure that is next to yours. Hold the figure's base with one hand, and pull back on the weapon, turning the base the opposite direction as you do so. Release the weapon to attack.
* Possessor - The Emperor has a special type of attack that allows him to control other figures (see below).
You get two attacks per turn. You cannot attack twice with the same figure during your turn.
Knocking Over -
When your figure gets knocked over by an opponent, it is defeated. If any part of the base is not touching the ground, the figure is considered knocked over. A figure that is partially knocked over (it supports itself by a weapon or limb) is still considered knocked over.
Look at the bottom of your defeated figure for its special power. Special powers take effect immediately after a figure is knocked over even if your opponent has not finished his/her attack phase. Special powers are activated when the Attacktix Window on the bottom of the base shows white. If the window is not white, ignore the special power.
After you have used the special power, put the figure in your defeated area.
Special powers can affect the battle figure that has been knocked over or another battle figure. The affected battle figure can be listed by name, Attacktix class, or Star Wars class. If the listed figure is not available, then the special power does not happen.
If you knock over multiple opponent's figures during an attack, all of them are defeated. If you accidentially or purposefully knock over your own figure during an attack, it is defeated.
Special Powers -
Here are the Special Powers:
* Attackback: Make a free move and attack for your listed battle figure.
* Rally: Bring the listed figure into play from your defeated area. Figure is placed 2 tix in from your starting edge.
* Recover: Stand up the knocked-over figure where it fell if you have the listed figure in play. If knocked out of play area, figure is placed 2 tix in from your starting edge.
* Recruit: Bring the listed figure into play from your back-ups. Figure is placed 2 tix in from your starting edge.
* Shootback: Make a free attack with your listed battle figure.
* Sacrifice: Replace the listed figure with the battle figure that was knocked over. The replaced figure is sent to its defeataed area, and its special power does not function.
* Vengeance: Remove opponent's listed figure and put it in its defeated area. Its special power does not take effect.
Always "grind" a figure by rolling it forward a few tix before putting it into play.
If more than one figure is knocked over by the same attack, the attacker chooses the order in which the special powers occur.
The Emperor -
The Emperor has a special form of attack known as possession. The Emperor may attack any figure that it touches. The Emperor is then attached to the figure that it "possesses" by lifting and clamping its arms around the possessed figure.
Once attached, the Emperor's base cannot touch the play area. If you can't attach the Emperor without him touching the play area, the possession does not take affect. The Emperor is left next to the battle figure it was attempting to possess.
The possessed figure immediately becomes part of the Emperor's side and its attack can be used as part of normal play. If the possessed figure is knocked over, the player controlling the Emperor may use its special power. After being knocked over and the special power (if any) resolved, the figures -- including the Emperor -- are sent to their original owner's defeated areas. The possession ends if the Emperor is knocked off by opponent attack (and possessed figure remains standing). If the Emperor falls off for other reasons, Emperor is reattached.
You Win When -
You knock over or remove all of your opponent's figures. Last one standing wins!
Attacktix Code of Conduct
Attacktix Code of Conduct:
A Few Guidelines When Playing an Attacktix Tournament
1. Always play fairly and honestly.
2. Be sure to read the quick start guide.
3. If you are not sure of a rule, ask us.
4. If you or your opponent disagree on how a rule should be played," grind" a figure - winner decides.
5. Decide how many points both you and your opponent's squad will have before playing.
6. Once you start moving your figure, you can't "take it back."
7. If you move more clicks then your figure is allowed you must move the number of the extra clicks in the opposite direction.
8. If you accidentally move your opponent's figure (with your hand or by pushing it with your figure) place it back where it was.
9. If you accidentally move one of your own figures when it shouldn't be moved, place it where it was.
10. If you forget to attack with one of your figures you can't go back and attack with it later.
11. If you forget to reload your missiles and you start moving your figures you can reload your missiles before attacking.
12. If you forget to use a Special Power when your figure is knocked down you can't go back and use it.
Updated October, 2005
The Attacktix Patent
Document on USPTO website
Action figure game piece and method of playing action figure game
Abstract
Claims
1-35. (canceled)
36: A method of playing an action figure game on a surface, the method comprising: providing for each player a plurality of game pieces, each game piece having an indicium indicating a point value, a distance measuring device for indicating a distance the game piece has moved over the surface, and a weapon for attacking an opponent's game pieces, wherein each of the plurality of game pieces includes at least one game piece having a close-acting weapon and at least one game piece having a distance-acting weapon; selecting for each player a group of the game pieces having point values summing to a predetermined value; selecting a number of actions each player can take per player's turn, an action comprising either a move, comprising moving a game piece a distance up to the particular game piece's point value, or an attack, comprising actuation of the particular game piece's weapon; and removing a game piece from the game if the game piece is determined to have been killed by an attack, wherein the players alternate taking turns, selectively making a move or an attack, until the game is determined to have ended.
37: The method of claim 36 wherein at least one of each game piece in each of the plurality of game pieces includes means a reward indicator for randomly providing the player with a reward if that particular game piece is killed.
38: The method of claim 36 wherein a game piece is killed if the game piece is knocked over by an attack.
39: The method of claim 36, wherein the game ends upon completion of a predetermined time period.
40: The method of claim 36 wherein the game ends upon elimination of all of one of the player's game pieces.
41: The method of claim 36 wherein each player may take up to a predetermined number of actions per turn.
42: The method of claim 41 wherein the number of actions per turn is three.
43: The method of claim 41 wherein each player can take no more than two actions or moves per turn.
44: The method of claim 36 wherein any particular game piece can perform multiple actions per turn.
45: A method of playing an action figure game on a surface, the method comprising: selecting by each player a plurality of game pieces of the action figure game, each game piece having an associated point value; each player in turn taking up to a predetermined number of actions with the player's game pieces, wherein each action is one of moving a game piece over the surface and performing an attack action against another player's game piece with one of the player's game pieces; and removing a player's game piece from the game if the game piece is killed in accordance to game rules by an opposing player's attack action.
46: The method of claim 45, comprising selecting by each player the plurality of game pieces such that the point values associated with the selected game pieces sum to a predetermined total point value.
47: The method of claim 45, wherein the action of moving a game piece over the surface comprises moving the game piece over the surface a distance less than or equal to a maximum distance corresponding to the point value associated with the game piece.
48: The method of claim 45, wherein the action of performing an attack action comprises actuating an attack mechanism of the player's game piece in the direction of an opposing player's game piece.
49: The method of claim 45, comprising removing a player's game piece from the game if the game piece is knocked over by an opposing player's attack action.
50: The method of claim 45, comprising calculating a final point value for each player equal to the point values for the player's remaining game pieces at the end of the game, wherein the player having the greatest final point value is the winner of the game
51: The method of claim 45, comprising: alternately displaying and shielding special character indicia of the game pieces as the game pieces move across the surface; and providing a player with a game award in accordance with the special character indicia of the game piece if the special character indicia are displayed when the game piece is killed.
52: A method of playing an action figure game on a surface, the method comprising: selecting by each player a plurality of game pieces of the action figure game, each game piece having an associated point value; each player in turn taking at least one action with at least one of the player's game pieces, wherein each action is one of moving a game piece over the surface and performing an attack action against another player's game piece with one of the player's game pieces; and removing a player's game piece from the game if the game piece is killed in accordance to game rules by an opposing player's attack action.
53: The method of claim 52, comprising selecting by each player the plurality of game pieces such that the point values associated with the selected game pieces sum to a predetermined total point value.
54: The method of claim 52, wherein the action of moving a game piece over the surface comprises moving the game piece over the surface a distance less than or equal to a maximum distance corresponding to the point value associated with the game piece.
55: The method of claim 52, wherein the action of performing an attack action comprises actuating an attack mechanism of the player's game piece in the direction of an opposing player's game piece.
56: The method of claim 52, comprising removing a player's game piece from the game if the game piece is knocked over by an opposing player's attack action.
57: The method of claim 52, comprising calculating a final point value for each player equal to the point values for the player's remaining game pieces at the end of the game, wherein the player having the greatest final point value is the winner of the game
58: The method of claim 52, comprising: alternately displaying and shielding special character indicia of the game pieces as the game pieces move across the surface; and providing a player with a game award in accordance with the special character indicia of the game piece if the special character indicia are displayed when the game piece is killed.
59: The method of claim 52, comprising each player in turn taking a predetermined number of actions with player's game pieces.
Description
BACKGROUND OF THE INVENTION
[0001] Action figure games typically require game boards for play. This can make the portability of the game more difficult.
[0002] The present invention is provided to solve this and other problems.
SUMMARY OF THE INVENTION
[0003] It is an object of the invention to provide an action figure game piece.
[0004] In accordance with the invention, the game piece comprises a game figure character adapted for movement a distance over a surface and means for indicating the distance of movement over the surface.
[0005] It is contemplated that the distance indicating means provides an audible and/or visual indication of the distance. In particular, the distance indicating means may comprise an axle, a wheel fixedly secured to the axle and adapted for rotary engagement with the surface, to rotate the axle upon movement of the game piece over the surface, and means for indicating progressive rotation of the axle.
[0006] It is further contemplated that the game piece includes means for attacking another game piece. The attacking means may comprise a means for launching a projectile. Alternatively, the attacking means may comprise a spring, a striking portion, and means for permitting rotation of the striking portion of the game piece in a first direction relative to the spring to bias the striking portion, such that the striking portion will rotate in a second, opposite direction upon release.
[0007] It is a further object of the invention to provide a method of playing an action figure game on a surface.
[0008] In accordance with this aspect of the invention, the method comprises providing for each player a plurality of game pieces, each game piece having an indicium indicating a point value, a means for indicating a distance the game piece has moved over the surface, and a means for attacking an opponent player's game pieces. The method further comprises selecting for each player a group of the game pieces having point values summing to a predetermined value, and selecting a number of actions each player can take per player's turn. An action comprises either a move, comprising moving a game piece a distance up to the particular game piece's point value, or an attack, comprising actuation of the particular game piece's attacking means. The players alternate taking turns, selectively making a move or an attack, until the game is determined to have ended.
[0009] It is contemplated that a game piece is removed from the game if the game piece is determined to have been killed by an attack.
[0010] It is further contemplated that at least one of each game piece in each of the plurality of game pieces includes means for randomly providing the player with a reward if that particular game piece is killed.
[0011] It is still further contemplated that the plurality of game pieces includes at least one game piece having a close-acting attacking means and at least one game piece having a distance-acting attacking means.
[0012] Other features and advantages will be apparent from the following specification taken in conjunction with the following drawings.
BRIEF DESCRIPTION OF THE DRAWINGS
[0013] FIG. 1 is a perspective of one embodiment of an action figure in accordance with the invention;
[0014] FIG. 2 is an exploded view of the action figure of FIG. 1;
[0015] FIG. 3 is a plan view of a base portion of the action figure of FIG. 1;
[0016] FIG. 4 is a sectional view taken along line 4-4 of FIG. 3;
[0017] FIG. 5 is a view of one side of the base portion of FIG. 3;
[0018] FIG. 6 is a sectional view taken along line 6-6 of FIG. 3;
[0019] FIG. 7 is a view of another side of the base portion of FIG. 3;
[0020] FIG. 8 is a perspective of a second embodiment of an action figure in accordance with the invention; and
[0021] FIG. 9 is an exploded view of the action figure of FIG. 8.
DETAILED DESCRIPTION OF A PREFERRED EMBODIMENT
[0022] A first embodiment of an action figure game piece 10 is illustrated in FIGS. 1-7. The game piece 10 comprises a game figure character 12 and a base portion 14. The base portion 14 is adapted for movement a distance over a surface, such as a table top, not shown. The game piece 10 includes a mechanism, described below, disposed within the base portion 14 for audibly and visually (such as for the hearing impaired) indicating the distance of movement of the game piece 10 over the surface. The game piece 10 further includes a mechanism, also described below, for attacking another game piece.
[0023] As shown in FIGS. 2, 4 and 6, the mechanism for audibly indicating the distance of movement comprises an axle 318, a wheel 20 fixedly secured to the axle 18 and adapted for rotary engagement with the surface to rotate the axle 18 upon movement of the game piece 10 over the surface. The mechanism further includes a pinion gear 24 fixedly secured to the axle 18 and including a plurality of teeth 26. one of the teeth 26 has a tooth extension 26a. A clicker 28 has a first end 28a secured to the base portion 14 and a second end 28b engaging the pinion gear 24. Rotation of the wheel 20 as the game piece 10 is moved over the surface rotates the tooth extension 26a against the clicker second end 28b, providing an audible clicking sound once per revolution of the axle 18.
[0024] The mechanism for visually indicating the distance of movement comprises a circular rack 30 engaging the pinion gear 24. The circular rack 30 includes an upper surface 30a and a lower surface 30b. The upper surface 30a has circumferentially spaced first red marks 34. An upper, black faceplate 36 is disposed on the base portion 14 adjacent the rack surface 30a. The upper faceplate 36 has a first visual aperture 38 radially aligned with the first red marks 34 to sequentially display movement of the first red marks as the rack 30 rotates. The number of first red marks passing by the aperture 38 indicates the distance traveled.
[0025] The game piece 10 has a mechanism for attacking another game piece. This attack mechanism is a distance-acting attack mechanism, as illustrated in FIGS. 1 and 2. The distance acting attack mechanism is conventional and launches a projectile 42 from a barrel 44. The barrel 44 has an internal spring (not shown). The projectile 42 has a tab 46. When a portion of the projectile 42 including the tab 46 is inserted into the barrel 44, the projectile 42 compresses the spring, and the tab 46 engages a catch (not shown) within the barrel 44, retaining the projectile 42 in the barrel 44 against the bias of the compressed spring. When actuated, a trigger 48, coupled to the catch, releases the catch from the tab 46, permitting the compressed spring to launch the projectile 42 a distance from the barrel 44.
[0026] A second embodiment of a game piece 10' is illustrated in FIGS. 8 and 9. Similar components have the same reference numbers as the first embodiment 10, the only difference being the attack mechanism. The second embodiment of the game piece 10' has a close-acting attack mechanism. The close-acting attack mechanism permits a portion of the game piece 10 to strike another game piece 10. The game FIG. 12 utilizing this attack mechanism has an upper portion 12a, having a striking portion 48, which is rotatably mounted to a lower portion 12b. A spring 49 is disposed between the upper portion 12a and the lower portion 12b, holding the upper portion 12a at an equilibrium position relative to the lower portion 12b. When the upper portion 12a is rotated in a first direction relative to the lower portion 12b, the spring 49 is compressed. When released, the upper portion 12a rapidly rotates in a second, opposite direction relative to the lower portion 12b to the equilibrium position, causing the striking portion 48 to strike anything in its path, such as an adjacent game piece opponent.
[0027] The game piece 10 also includes a mechanism for alternatively displaying and shielding a series of second red marks 52 (in phantom), indicative of the presence or absence of a special characteristic of the game piece. The series of second red marks 52 are circumferentially spaced on the lower surface 30b. A second faceplate 56 is disposed on the base portion 14 adjacent the lower surface 30b. The second faceplate 56 has a visual aperture 58 radially aligned with the series of second red marks to alternatively display the presence or absence of the second series of red marks 52.
[0028] The method of playing an action figure game on the surface is as follows. Each player is initially provided with a plurality of the game pieces 10, 10' forming a pool of the game pieces 10, 10'. Each of the game pieces 10, 10' has a number indicating a particular point value. Different ones of the game pieces 10, 10' have different point values. Each of the game pieces 10, 10' has the distance indicating mechanism, and one of the attack mechanisms, described above. Each player initially selects a group of the game pieces 10, 10' from the player's respective pool, having point values summing to a predetermined value. This group will be the player's team. Any number of players may play.
[0029] During play, each player sequentially takes a turn. For each turn, each player can take a predetermined number of actions, for example, three. An action is either: (1) a move, comprising moving one of the player's game pieces 10, 10' a distance up to the particular game piece's point value; or (2) an attack, comprising actuation of the particular game piece's attack mechanism against one of an opponent's game pieces 10, 10'. During a turn, there may be limitations of how many total moves or attacks can be taken. For example if three actions are permitted, players may be limited to no more than two moves (and one attack) or two attacks (and one move) per turn.
[0030] A game piece 10, 10' is removed from the game if the game piece 10, 10' is determined to have been killed by an attack, such as being knocked over in response to an opponent's attack. The players sequentially take turns, selectively making a move or an attack, until the game is determined to have ended, such as when all of a player's game figures have been killed, or upon completion of a particular time period. The winner is determined by summing the point values of each players remaining game pieces.
[0031] According to the method, if a player's game piece 10, 10' is killed when one of its second red marks is present, the player is awarded in accordance with a message on the underside of the base portion 14. For example, the game piece 10, 10' may be permitted to re-enter the game. Or the player may add a different game piece 1-, 10' to the game.
[0032] Modifications and alternative embodiments of the invention will be apparent to those skilled in the art in view of the foregoing description. This description is to be construed as illustrative only, and is for the purpose of teaching those skilled in the art the best mode of carrying out the invention. The details of the structure and method may be varied substantially without departing from the spirit of the invention, and the exclusive use of all modifications which come within the scope of the appended claims is reserved.
* * * * *
| United States Patent Application | 20050133997 |
| Kind Code | A1 |
| Wilk, Brian M. ; et al. | June 23, 2005 |
Action figure game piece and method of playing action figure game
An action figure game piece is disclosed. The game piece comprises a game figure character adapted for movement a distance over a surface and a mechanism for indicating the distance of movement over the surface. A method of playing an action figure game on the surface is also disclosed. The method comprises providing for each player a plurality of the game pieces, each game piece having an indicium indicating a point value, a mechanism for indicating a distance the game piece has moved over the surface, and a mechanism for attacking an opponent player's game pieces. The method also comprises selecting for each player a group of the game pieces having point values summing to a predetermined value and selecting a number of actions each player can take per player's turn. An action comprises either a move, comprising moving a game piece a distance up to the particular game piece's point value, or an attack, comprising actuation of the particular game piece's attacking mechanism. Players alternate taking turns, selectively making a move or an attack, until the game is determined to have ended.
| Inventors: | Wilk, Brian M.; (Seekonk, MA) ; Kunitz, David; (Barrington, RI) ; McCarthy, Thomas C .; (Warren, RI) ; Winters, Henry S.; (Pawtucket, RI) |
| Correspondence Name and Address: | MARSHALL, GERSTEIN & BORUN LLP (HASBRO) |
| Assignee Name and Adress: | HASBRO, INC. Pawtucket RI |
| Serial No.: | 053355 |
| Series Code: | 11 |
| Filed: | February 8, 2005 |
| U.S. Current Class: | 273/288; 273/289 |
| U.S. Class at Publication: | 273/288; 273/289 |
| Intern'l Class: | A63F 003/00 |
1-35. (canceled)
36: A method of playing an action figure game on a surface, the method comprising: providing for each player a plurality of game pieces, each game piece having an indicium indicating a point value, a distance measuring device for indicating a distance the game piece has moved over the surface, and a weapon for attacking an opponent's game pieces, wherein each of the plurality of game pieces includes at least one game piece having a close-acting weapon and at least one game piece having a distance-acting weapon; selecting for each player a group of the game pieces having point values summing to a predetermined value; selecting a number of actions each player can take per player's turn, an action comprising either a move, comprising moving a game piece a distance up to the particular game piece's point value, or an attack, comprising actuation of the particular game piece's weapon; and removing a game piece from the game if the game piece is determined to have been killed by an attack, wherein the players alternate taking turns, selectively making a move or an attack, until the game is determined to have ended.
37: The method of claim 36 wherein at least one of each game piece in each of the plurality of game pieces includes means a reward indicator for randomly providing the player with a reward if that particular game piece is killed.
38: The method of claim 36 wherein a game piece is killed if the game piece is knocked over by an attack.
39: The method of claim 36, wherein the game ends upon completion of a predetermined time period.
40: The method of claim 36 wherein the game ends upon elimination of all of one of the player's game pieces.
41: The method of claim 36 wherein each player may take up to a predetermined number of actions per turn.
42: The method of claim 41 wherein the number of actions per turn is three.
43: The method of claim 41 wherein each player can take no more than two actions or moves per turn.
44: The method of claim 36 wherein any particular game piece can perform multiple actions per turn.
45: A method of playing an action figure game on a surface, the method comprising: selecting by each player a plurality of game pieces of the action figure game, each game piece having an associated point value; each player in turn taking up to a predetermined number of actions with the player's game pieces, wherein each action is one of moving a game piece over the surface and performing an attack action against another player's game piece with one of the player's game pieces; and removing a player's game piece from the game if the game piece is killed in accordance to game rules by an opposing player's attack action.
46: The method of claim 45, comprising selecting by each player the plurality of game pieces such that the point values associated with the selected game pieces sum to a predetermined total point value.
47: The method of claim 45, wherein the action of moving a game piece over the surface comprises moving the game piece over the surface a distance less than or equal to a maximum distance corresponding to the point value associated with the game piece.
48: The method of claim 45, wherein the action of performing an attack action comprises actuating an attack mechanism of the player's game piece in the direction of an opposing player's game piece.
49: The method of claim 45, comprising removing a player's game piece from the game if the game piece is knocked over by an opposing player's attack action.
50: The method of claim 45, comprising calculating a final point value for each player equal to the point values for the player's remaining game pieces at the end of the game, wherein the player having the greatest final point value is the winner of the game
51: The method of claim 45, comprising: alternately displaying and shielding special character indicia of the game pieces as the game pieces move across the surface; and providing a player with a game award in accordance with the special character indicia of the game piece if the special character indicia are displayed when the game piece is killed.
52: A method of playing an action figure game on a surface, the method comprising: selecting by each player a plurality of game pieces of the action figure game, each game piece having an associated point value; each player in turn taking at least one action with at least one of the player's game pieces, wherein each action is one of moving a game piece over the surface and performing an attack action against another player's game piece with one of the player's game pieces; and removing a player's game piece from the game if the game piece is killed in accordance to game rules by an opposing player's attack action.
53: The method of claim 52, comprising selecting by each player the plurality of game pieces such that the point values associated with the selected game pieces sum to a predetermined total point value.
54: The method of claim 52, wherein the action of moving a game piece over the surface comprises moving the game piece over the surface a distance less than or equal to a maximum distance corresponding to the point value associated with the game piece.
55: The method of claim 52, wherein the action of performing an attack action comprises actuating an attack mechanism of the player's game piece in the direction of an opposing player's game piece.
56: The method of claim 52, comprising removing a player's game piece from the game if the game piece is knocked over by an opposing player's attack action.
57: The method of claim 52, comprising calculating a final point value for each player equal to the point values for the player's remaining game pieces at the end of the game, wherein the player having the greatest final point value is the winner of the game
58: The method of claim 52, comprising: alternately displaying and shielding special character indicia of the game pieces as the game pieces move across the surface; and providing a player with a game award in accordance with the special character indicia of the game piece if the special character indicia are displayed when the game piece is killed.
59: The method of claim 52, comprising each player in turn taking a predetermined number of actions with player's game pieces.
BACKGROUND OF THE INVENTION
[0001] Action figure games typically require game boards for play. This can make the portability of the game more difficult.
[0002] The present invention is provided to solve this and other problems.
SUMMARY OF THE INVENTION
[0003] It is an object of the invention to provide an action figure game piece.
[0004] In accordance with the invention, the game piece comprises a game figure character adapted for movement a distance over a surface and means for indicating the distance of movement over the surface.
[0005] It is contemplated that the distance indicating means provides an audible and/or visual indication of the distance. In particular, the distance indicating means may comprise an axle, a wheel fixedly secured to the axle and adapted for rotary engagement with the surface, to rotate the axle upon movement of the game piece over the surface, and means for indicating progressive rotation of the axle.
[0006] It is further contemplated that the game piece includes means for attacking another game piece. The attacking means may comprise a means for launching a projectile. Alternatively, the attacking means may comprise a spring, a striking portion, and means for permitting rotation of the striking portion of the game piece in a first direction relative to the spring to bias the striking portion, such that the striking portion will rotate in a second, opposite direction upon release.
[0007] It is a further object of the invention to provide a method of playing an action figure game on a surface.
[0008] In accordance with this aspect of the invention, the method comprises providing for each player a plurality of game pieces, each game piece having an indicium indicating a point value, a means for indicating a distance the game piece has moved over the surface, and a means for attacking an opponent player's game pieces. The method further comprises selecting for each player a group of the game pieces having point values summing to a predetermined value, and selecting a number of actions each player can take per player's turn. An action comprises either a move, comprising moving a game piece a distance up to the particular game piece's point value, or an attack, comprising actuation of the particular game piece's attacking means. The players alternate taking turns, selectively making a move or an attack, until the game is determined to have ended.
[0009] It is contemplated that a game piece is removed from the game if the game piece is determined to have been killed by an attack.
[0010] It is further contemplated that at least one of each game piece in each of the plurality of game pieces includes means for randomly providing the player with a reward if that particular game piece is killed.
[0011] It is still further contemplated that the plurality of game pieces includes at least one game piece having a close-acting attacking means and at least one game piece having a distance-acting attacking means.
[0012] Other features and advantages will be apparent from the following specification taken in conjunction with the following drawings.
BRIEF DESCRIPTION OF THE DRAWINGS
[0013] FIG. 1 is a perspective of one embodiment of an action figure in accordance with the invention;
[0014] FIG. 2 is an exploded view of the action figure of FIG. 1;
[0015] FIG. 3 is a plan view of a base portion of the action figure of FIG. 1;
[0016] FIG. 4 is a sectional view taken along line 4-4 of FIG. 3;
[0017] FIG. 5 is a view of one side of the base portion of FIG. 3;
[0018] FIG. 6 is a sectional view taken along line 6-6 of FIG. 3;
[0019] FIG. 7 is a view of another side of the base portion of FIG. 3;
[0020] FIG. 8 is a perspective of a second embodiment of an action figure in accordance with the invention; and
[0021] FIG. 9 is an exploded view of the action figure of FIG. 8.
DETAILED DESCRIPTION OF A PREFERRED EMBODIMENT
[0022] A first embodiment of an action figure game piece 10 is illustrated in FIGS. 1-7. The game piece 10 comprises a game figure character 12 and a base portion 14. The base portion 14 is adapted for movement a distance over a surface, such as a table top, not shown. The game piece 10 includes a mechanism, described below, disposed within the base portion 14 for audibly and visually (such as for the hearing impaired) indicating the distance of movement of the game piece 10 over the surface. The game piece 10 further includes a mechanism, also described below, for attacking another game piece.
[0023] As shown in FIGS. 2, 4 and 6, the mechanism for audibly indicating the distance of movement comprises an axle 318, a wheel 20 fixedly secured to the axle 18 and adapted for rotary engagement with the surface to rotate the axle 18 upon movement of the game piece 10 over the surface. The mechanism further includes a pinion gear 24 fixedly secured to the axle 18 and including a plurality of teeth 26. one of the teeth 26 has a tooth extension 26a. A clicker 28 has a first end 28a secured to the base portion 14 and a second end 28b engaging the pinion gear 24. Rotation of the wheel 20 as the game piece 10 is moved over the surface rotates the tooth extension 26a against the clicker second end 28b, providing an audible clicking sound once per revolution of the axle 18.
[0024] The mechanism for visually indicating the distance of movement comprises a circular rack 30 engaging the pinion gear 24. The circular rack 30 includes an upper surface 30a and a lower surface 30b. The upper surface 30a has circumferentially spaced first red marks 34. An upper, black faceplate 36 is disposed on the base portion 14 adjacent the rack surface 30a. The upper faceplate 36 has a first visual aperture 38 radially aligned with the first red marks 34 to sequentially display movement of the first red marks as the rack 30 rotates. The number of first red marks passing by the aperture 38 indicates the distance traveled.
[0025] The game piece 10 has a mechanism for attacking another game piece. This attack mechanism is a distance-acting attack mechanism, as illustrated in FIGS. 1 and 2. The distance acting attack mechanism is conventional and launches a projectile 42 from a barrel 44. The barrel 44 has an internal spring (not shown). The projectile 42 has a tab 46. When a portion of the projectile 42 including the tab 46 is inserted into the barrel 44, the projectile 42 compresses the spring, and the tab 46 engages a catch (not shown) within the barrel 44, retaining the projectile 42 in the barrel 44 against the bias of the compressed spring. When actuated, a trigger 48, coupled to the catch, releases the catch from the tab 46, permitting the compressed spring to launch the projectile 42 a distance from the barrel 44.
[0026] A second embodiment of a game piece 10' is illustrated in FIGS. 8 and 9. Similar components have the same reference numbers as the first embodiment 10, the only difference being the attack mechanism. The second embodiment of the game piece 10' has a close-acting attack mechanism. The close-acting attack mechanism permits a portion of the game piece 10 to strike another game piece 10. The game FIG. 12 utilizing this attack mechanism has an upper portion 12a, having a striking portion 48, which is rotatably mounted to a lower portion 12b. A spring 49 is disposed between the upper portion 12a and the lower portion 12b, holding the upper portion 12a at an equilibrium position relative to the lower portion 12b. When the upper portion 12a is rotated in a first direction relative to the lower portion 12b, the spring 49 is compressed. When released, the upper portion 12a rapidly rotates in a second, opposite direction relative to the lower portion 12b to the equilibrium position, causing the striking portion 48 to strike anything in its path, such as an adjacent game piece opponent.
[0027] The game piece 10 also includes a mechanism for alternatively displaying and shielding a series of second red marks 52 (in phantom), indicative of the presence or absence of a special characteristic of the game piece. The series of second red marks 52 are circumferentially spaced on the lower surface 30b. A second faceplate 56 is disposed on the base portion 14 adjacent the lower surface 30b. The second faceplate 56 has a visual aperture 58 radially aligned with the series of second red marks to alternatively display the presence or absence of the second series of red marks 52.
[0028] The method of playing an action figure game on the surface is as follows. Each player is initially provided with a plurality of the game pieces 10, 10' forming a pool of the game pieces 10, 10'. Each of the game pieces 10, 10' has a number indicating a particular point value. Different ones of the game pieces 10, 10' have different point values. Each of the game pieces 10, 10' has the distance indicating mechanism, and one of the attack mechanisms, described above. Each player initially selects a group of the game pieces 10, 10' from the player's respective pool, having point values summing to a predetermined value. This group will be the player's team. Any number of players may play.
[0029] During play, each player sequentially takes a turn. For each turn, each player can take a predetermined number of actions, for example, three. An action is either: (1) a move, comprising moving one of the player's game pieces 10, 10' a distance up to the particular game piece's point value; or (2) an attack, comprising actuation of the particular game piece's attack mechanism against one of an opponent's game pieces 10, 10'. During a turn, there may be limitations of how many total moves or attacks can be taken. For example if three actions are permitted, players may be limited to no more than two moves (and one attack) or two attacks (and one move) per turn.
[0030] A game piece 10, 10' is removed from the game if the game piece 10, 10' is determined to have been killed by an attack, such as being knocked over in response to an opponent's attack. The players sequentially take turns, selectively making a move or an attack, until the game is determined to have ended, such as when all of a player's game figures have been killed, or upon completion of a particular time period. The winner is determined by summing the point values of each players remaining game pieces.
[0031] According to the method, if a player's game piece 10, 10' is killed when one of its second red marks is present, the player is awarded in accordance with a message on the underside of the base portion 14. For example, the game piece 10, 10' may be permitted to re-enter the game. Or the player may add a different game piece 1-, 10' to the game.
[0032] Modifications and alternative embodiments of the invention will be apparent to those skilled in the art in view of the foregoing description. This description is to be construed as illustrative only, and is for the purpose of teaching those skilled in the art the best mode of carrying out the invention. The details of the structure and method may be varied substantially without departing from the spirit of the invention, and the exclusive use of all modifications which come within the scope of the appended claims is reserved.
Subscribe to:
Posts (Atom)